
Product Management
Setu Store: Product Management
Follow these simple steps to add your products and manage your vendor account effectively.
Adding Products
Here’s a step-by-step guide to adding products with multiple features
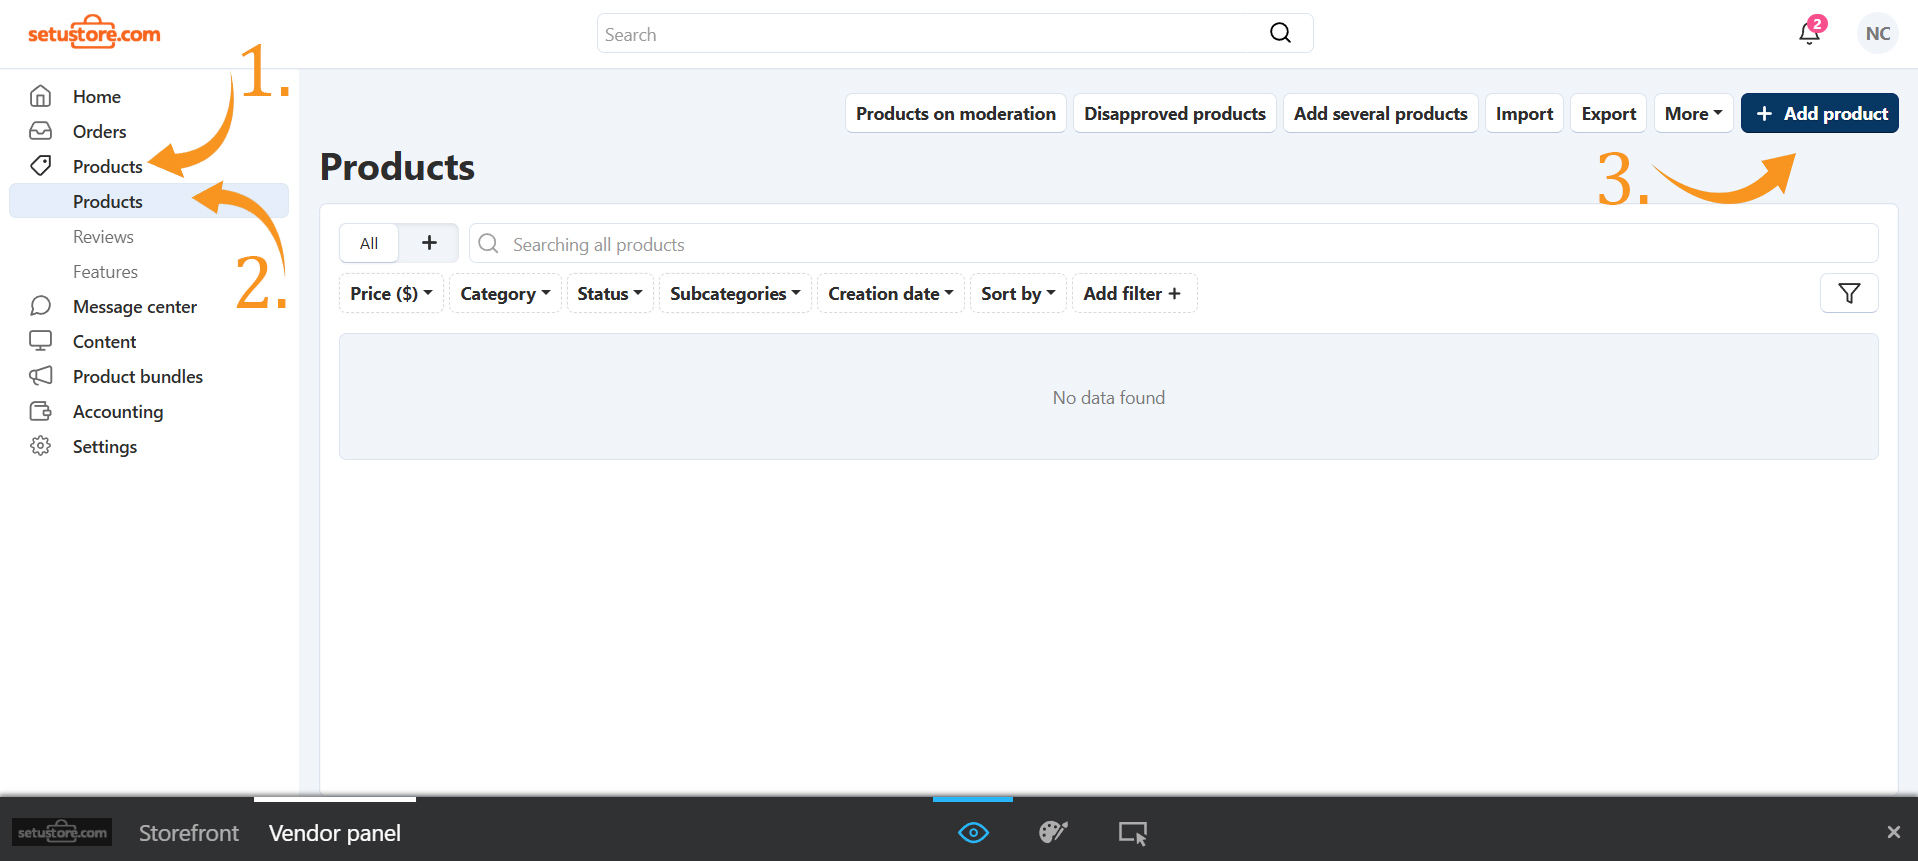
- In your vendor panel, in the left side there is a product button. Click on that.
- Now to add products, go to products, and click on "+ Add Product" button.
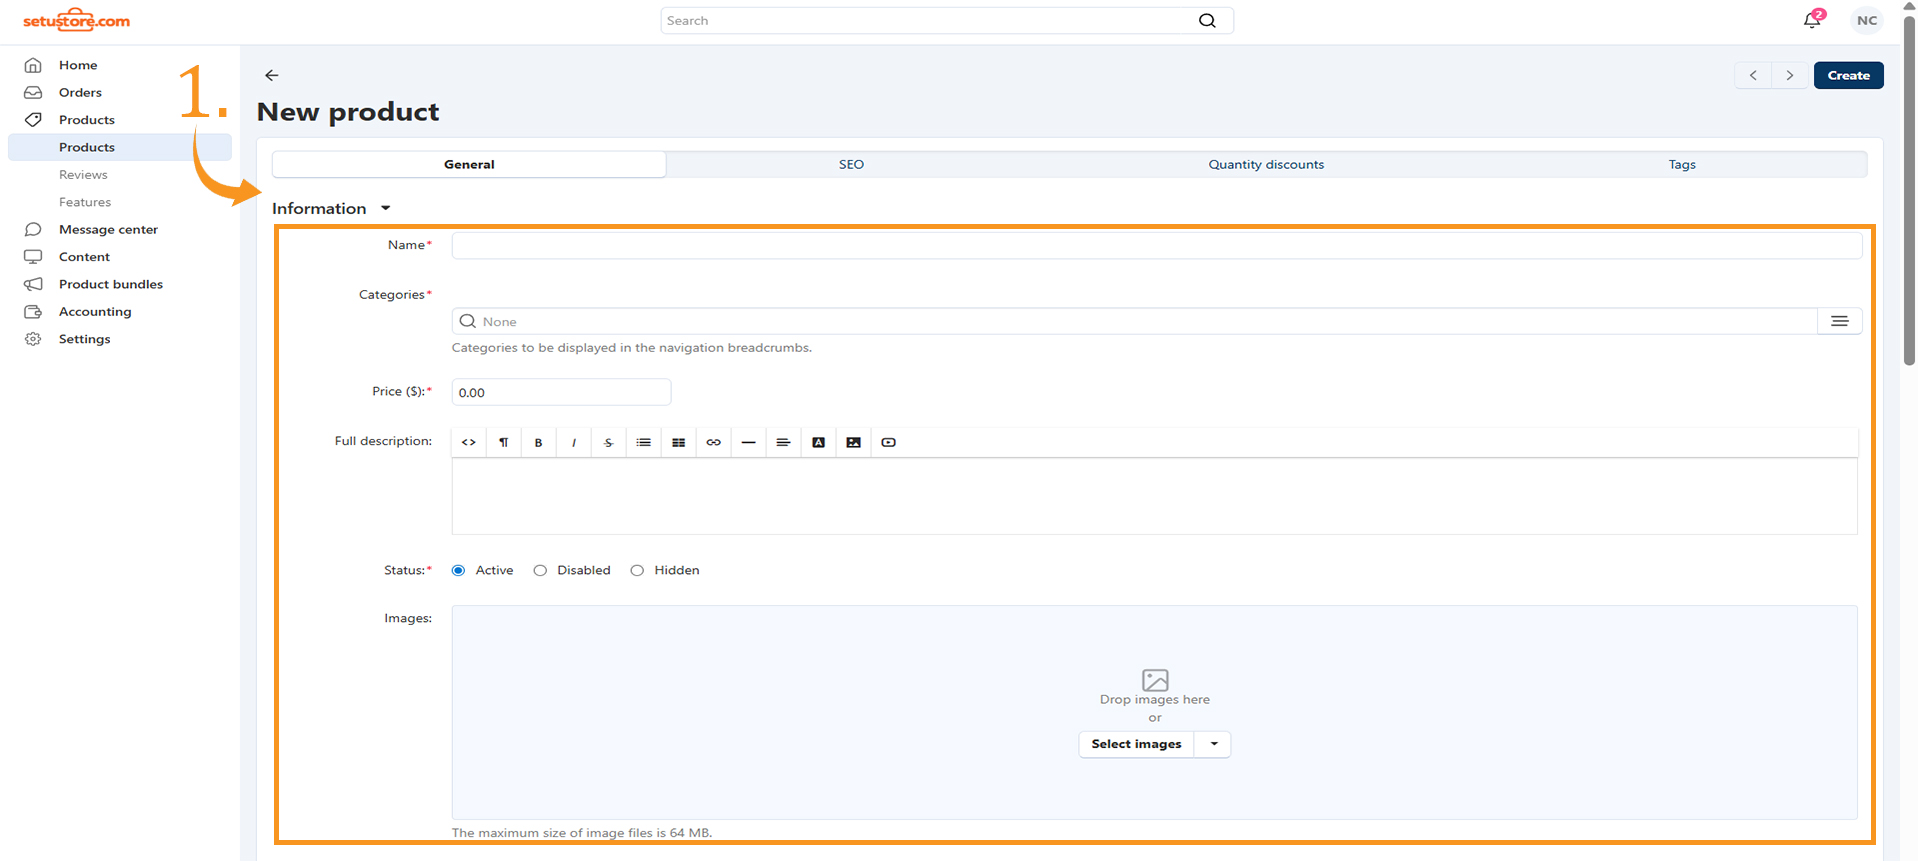
- Once the new product window opens, go to the General tab and fill in your product details. Keep the Options settings unchanged. Feel free to explore each field to understand them better The Option settings is left to be as it is. Explore each field.
- In the categories field, select a category from the listed categories by Setu Store.
Important: Product images must be uploaded in a square aspect ratio with minimum dimensions of 1100 x 1100 pixels.
Suggestion: Upload at least 4 high-quality images per product (front, back, side, and close-up) to give customers a complete view and improve sales potential.
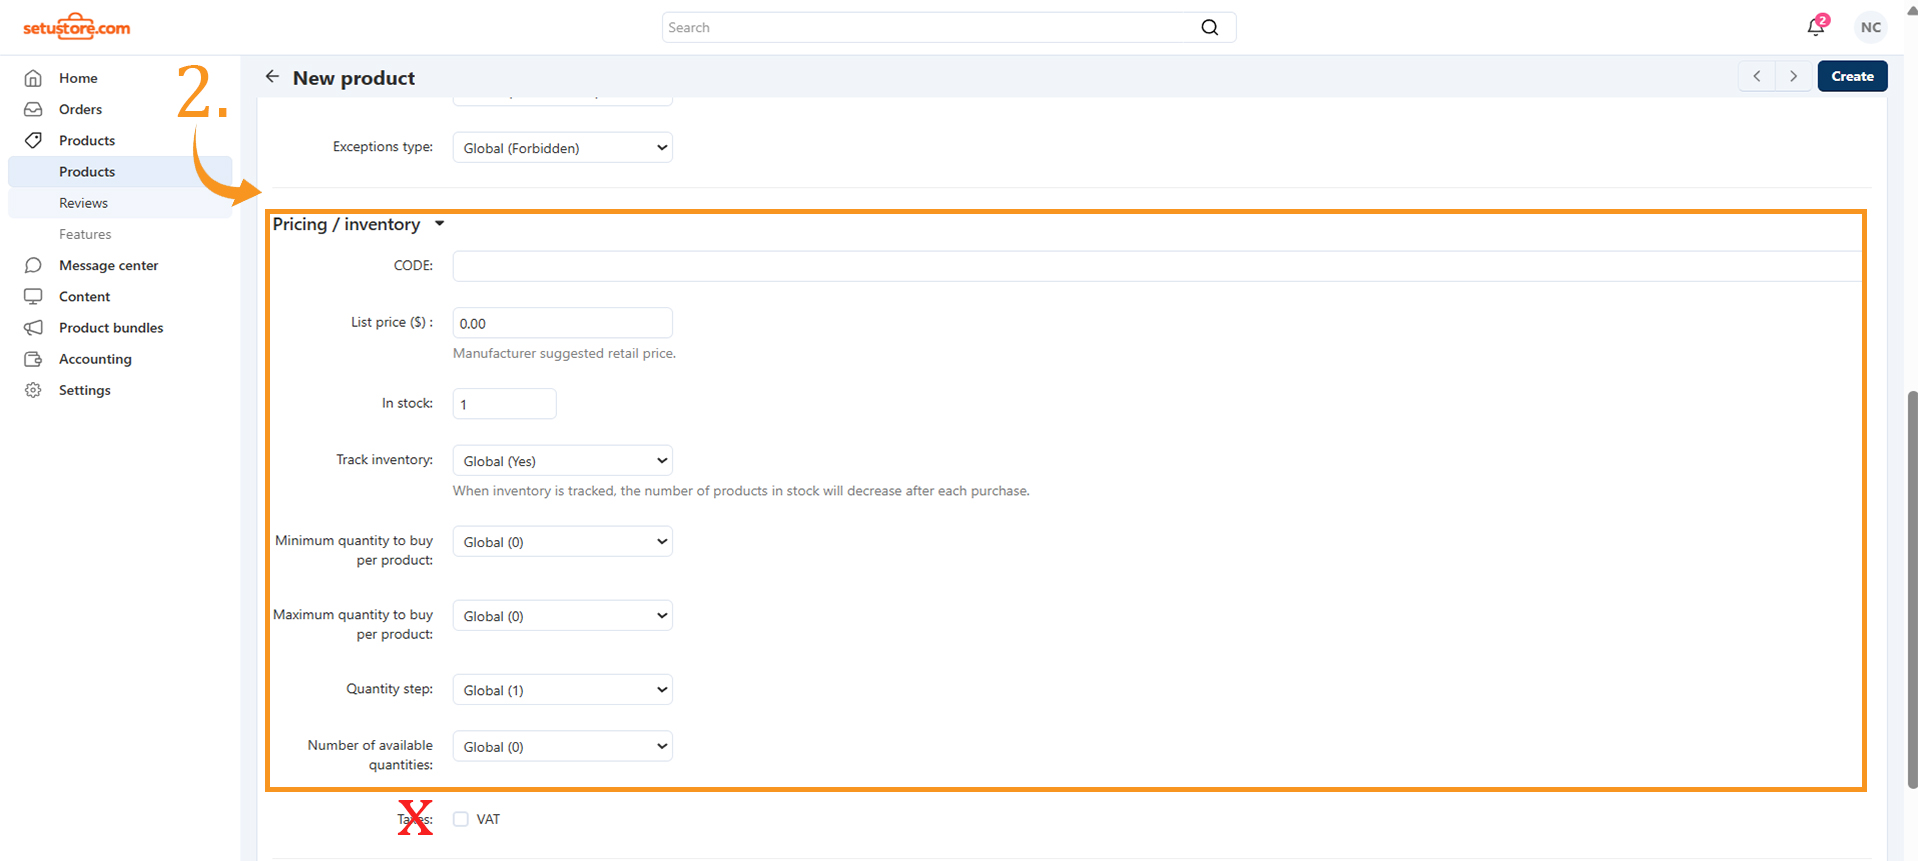
- The Max/Min Quantity to Buy fields let you set limits on how many items a customer can purchase. The Quantity Step setting controls how the number changes when buyers increase or decrease the product quantity
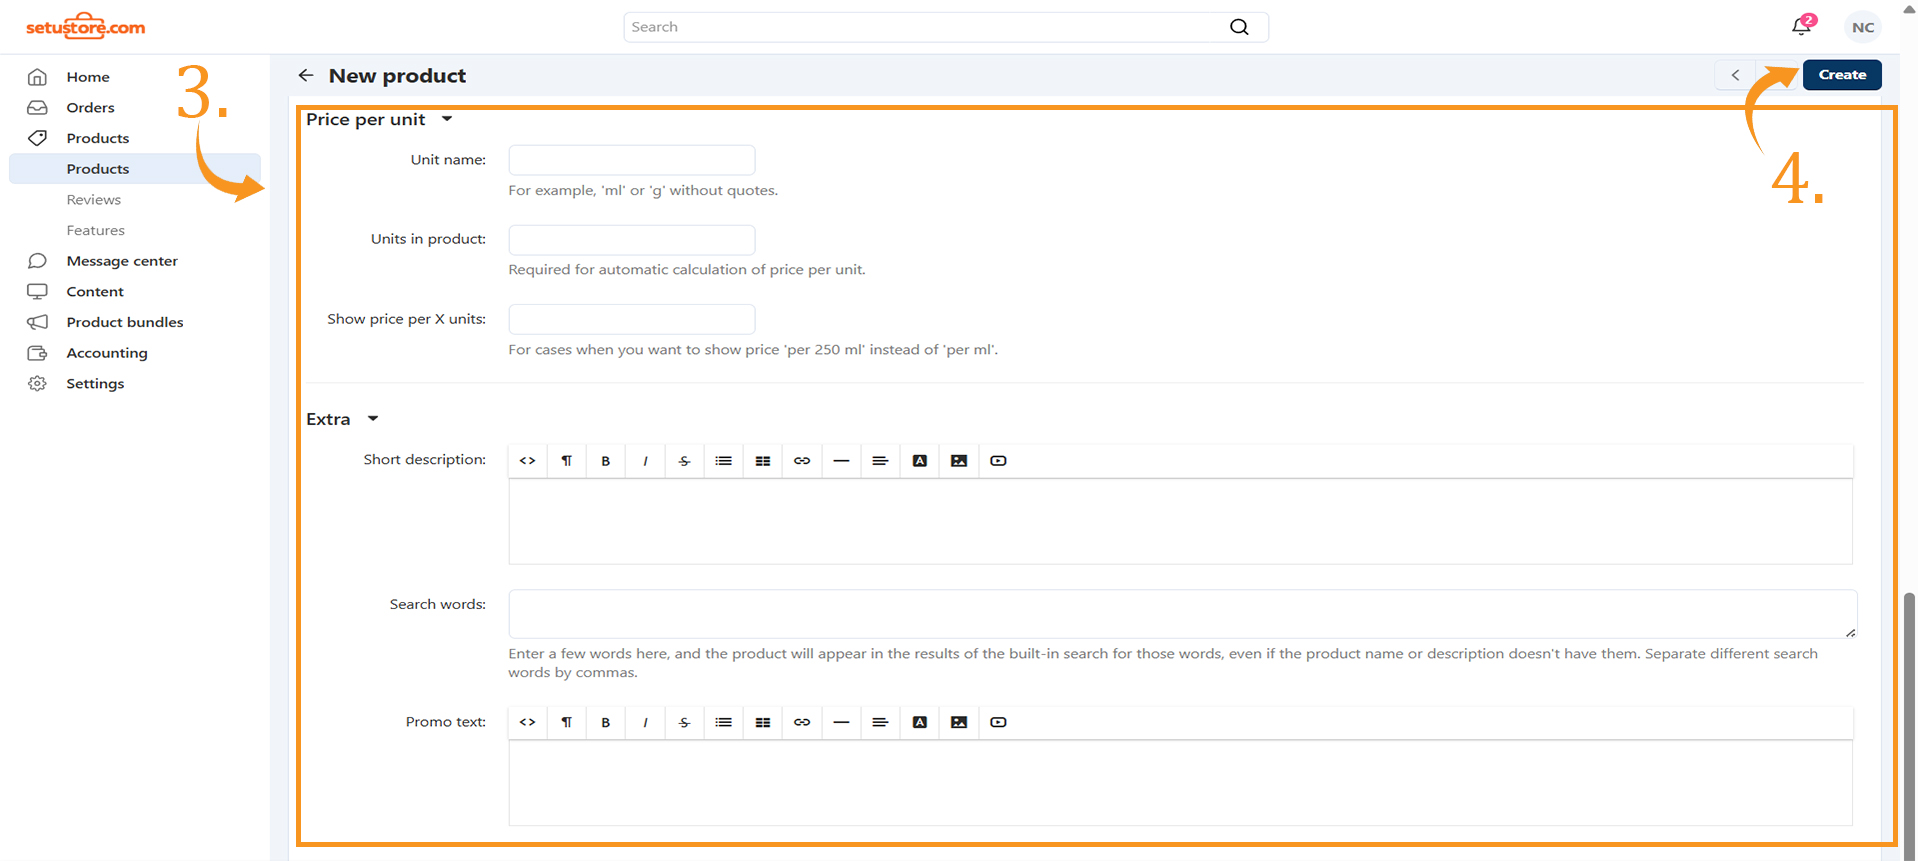
- Price Per Unit allows you to define the unit of measurement (e.g., ml, pcs, kg) and specify the cost per unit
- In Search Words, enter the keywords that customers can use to find your product
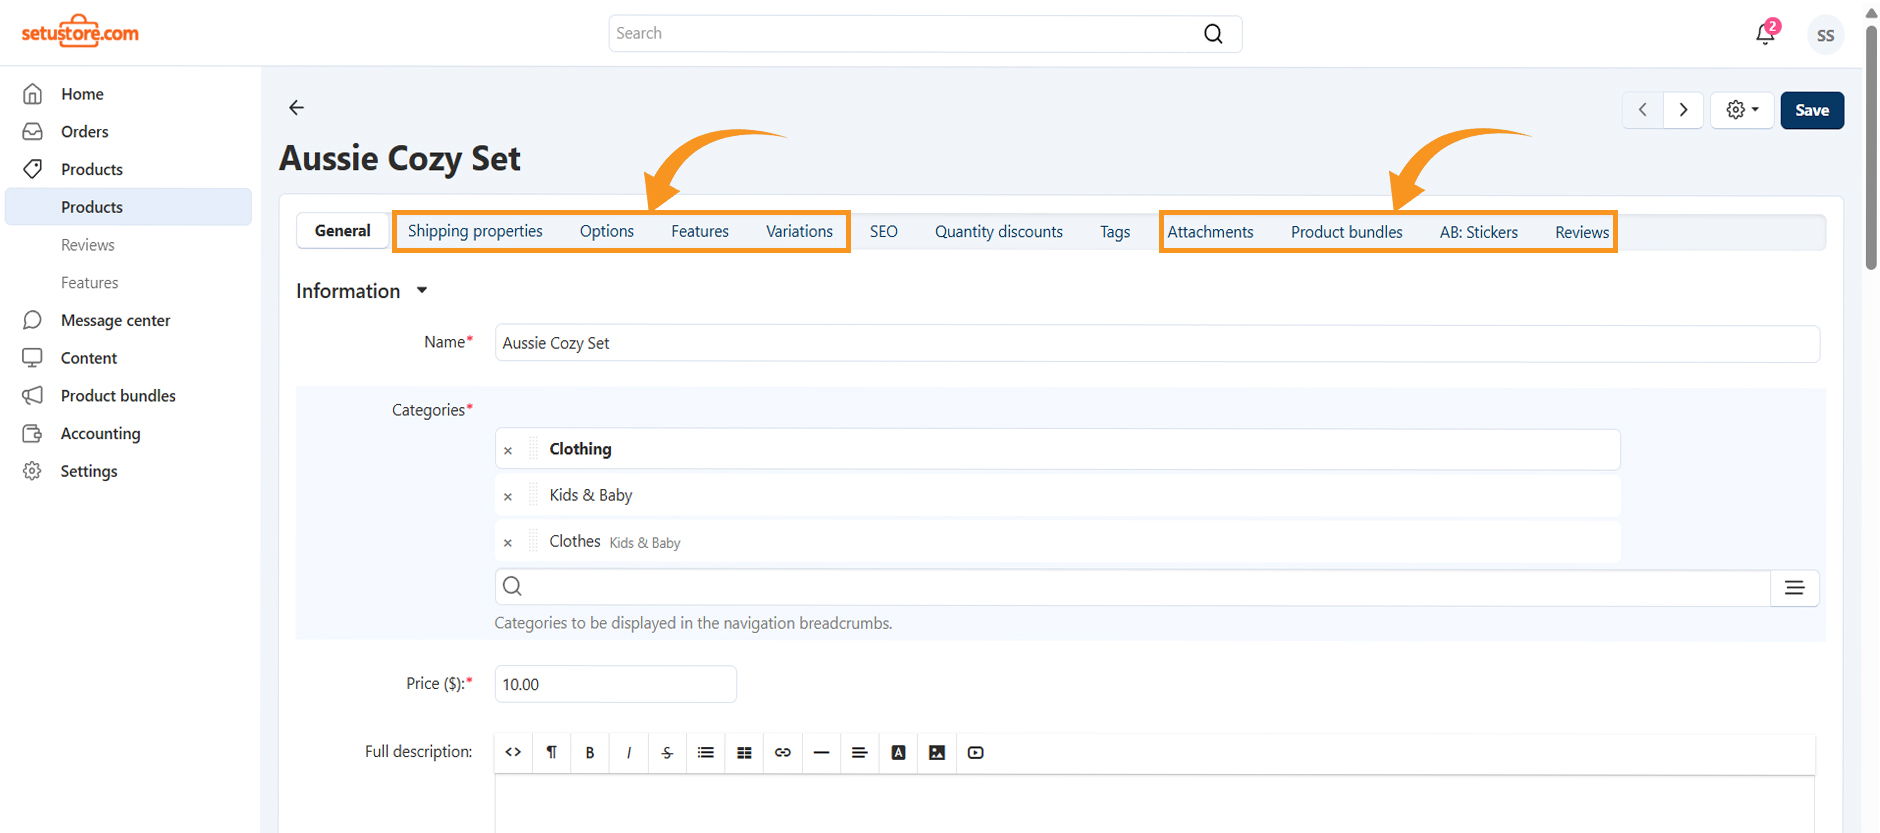
- Click on the Create button. The remaining tabs can be filled in afterward, and additional tabs will appear once the product is created
- After the previous step, new tabs such as Shipping Properties, Options, Features, and others will appear
- Step 2 will walk you through the Shipping Properties tab.
Important: Before moving to the next tab, make sure to save your changes to avoid losing any updates.
Note: If you want to add new product categories or subcategories, please contact the Setu Store Admin.
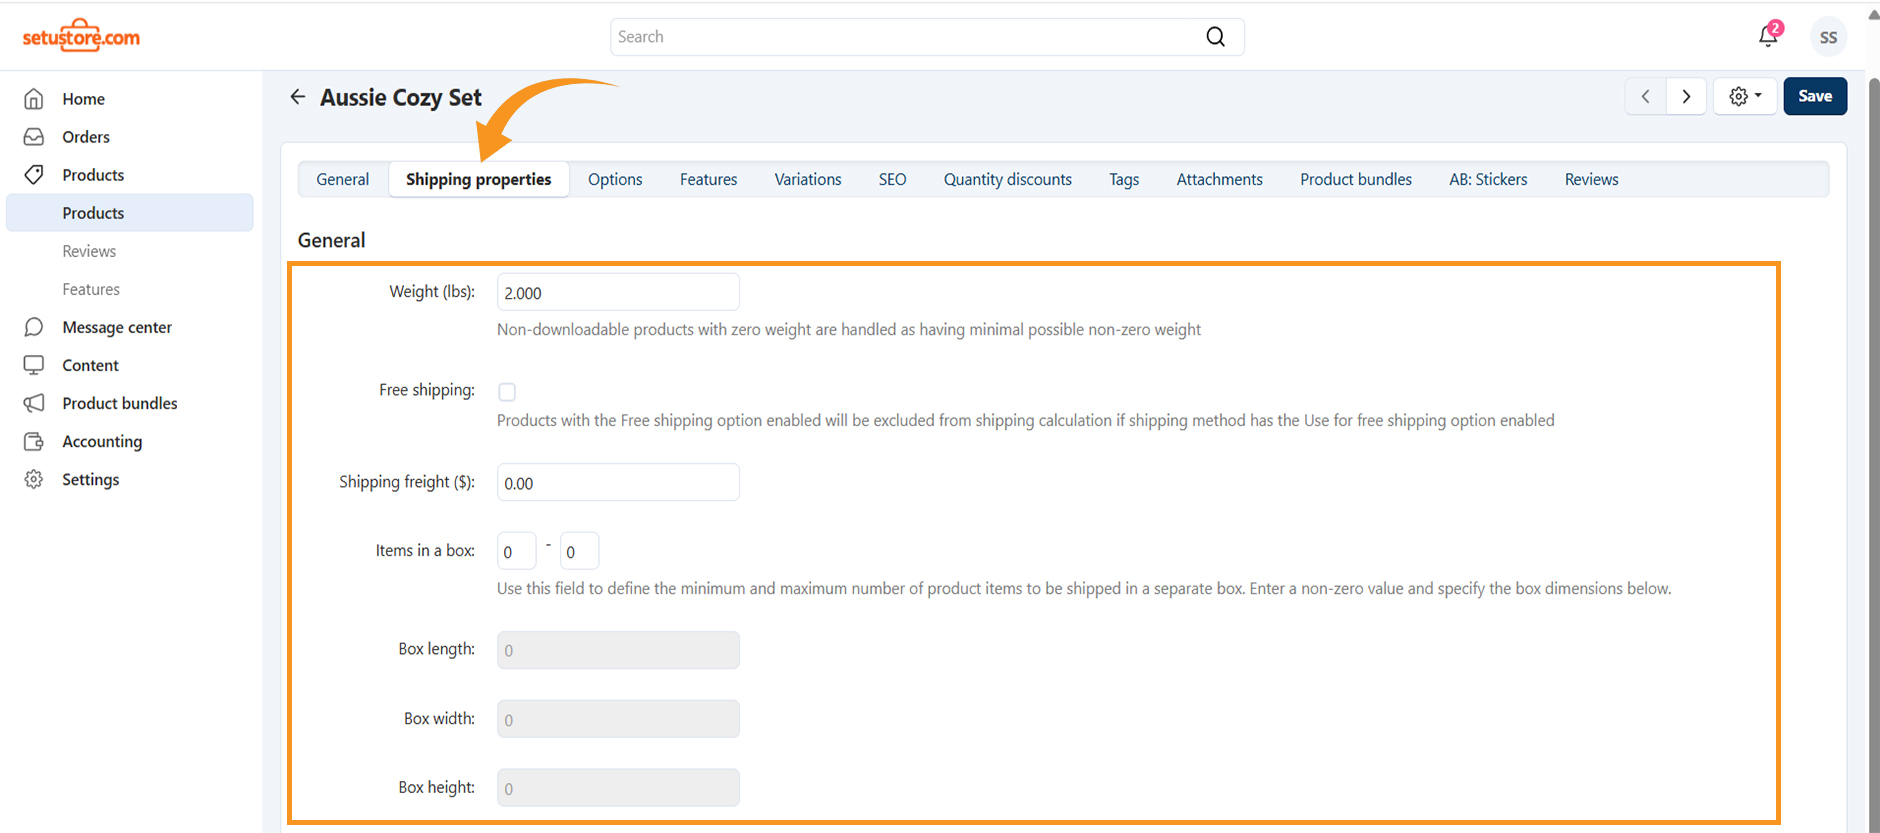
Shipping Properties
- In the Weight field, add the weight of the product in lbs.
- You can simply skip the Free Shipping and Shipping Freight sections
- In Items in a Box, specify the minimum and maximum number of products that can be packed in a single box. This represents the capacity of one package, with its dimensions to be entered in the next field.
- Mention the length, height and width of the packed product in the next consecutive fields in cm.
Make sure weight is in lbs(pounds) and dimensions are in centimeter.
Options Tab
Options are additional, customizable product properties. They don’t have their own quantity and do not affect the stock levels of the main product. However, they can influence the product’s price or weight.
Examples of options include:
- Custom engraving
- Gift wrap
- Extended warranty
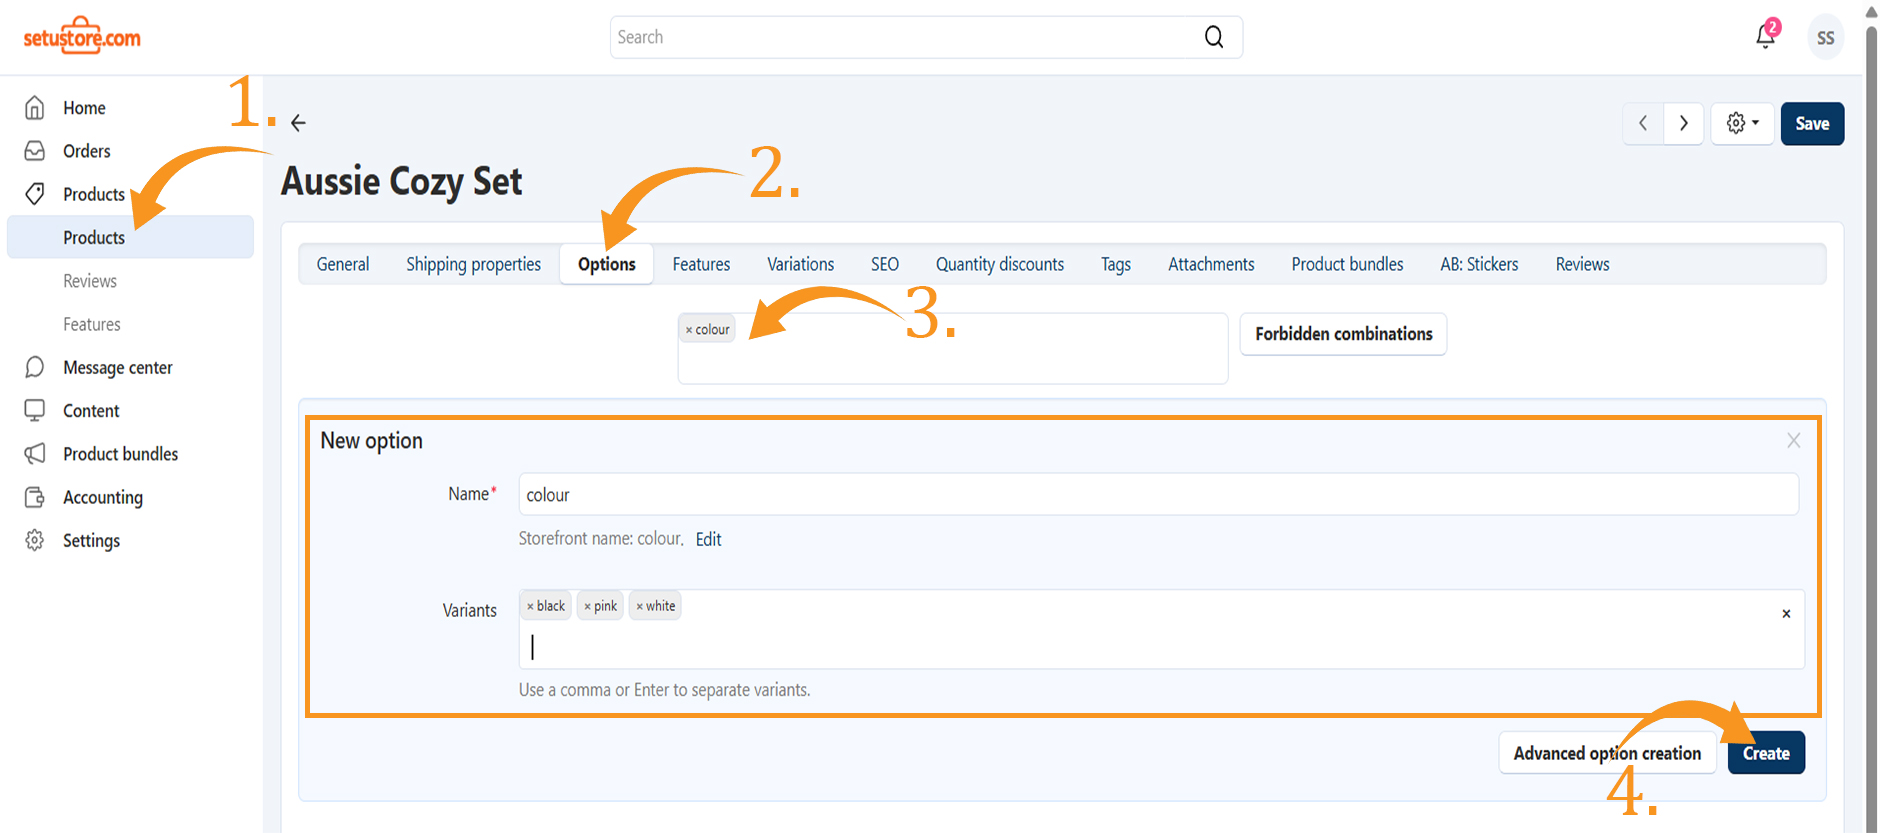
To create an option for a product:
- In the Admin Panel, navigate to Products → Products.
- Click on the product name to open its settings, then switch to the Options tab.
- Enter the Option Name. If it doesn’t exist yet, click Add.
- In the Variants field, add the option variants.
- Finally, click Create.
Note: Enter the amount or percentage in the Value field to specify the discount to be applied to the product price.
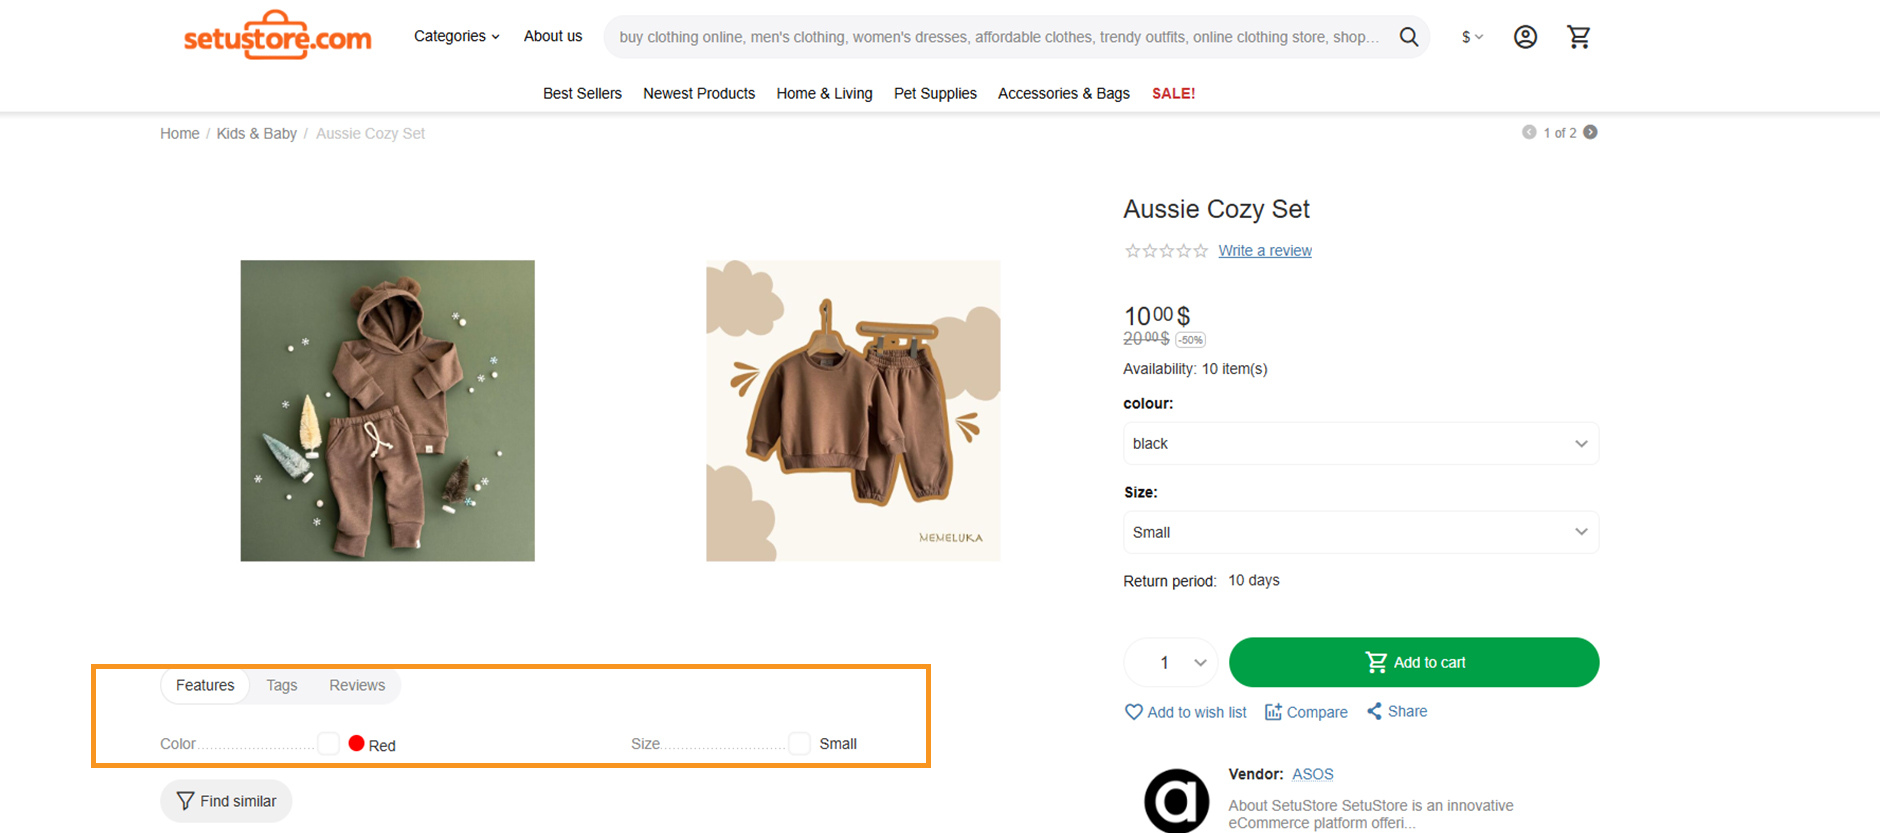
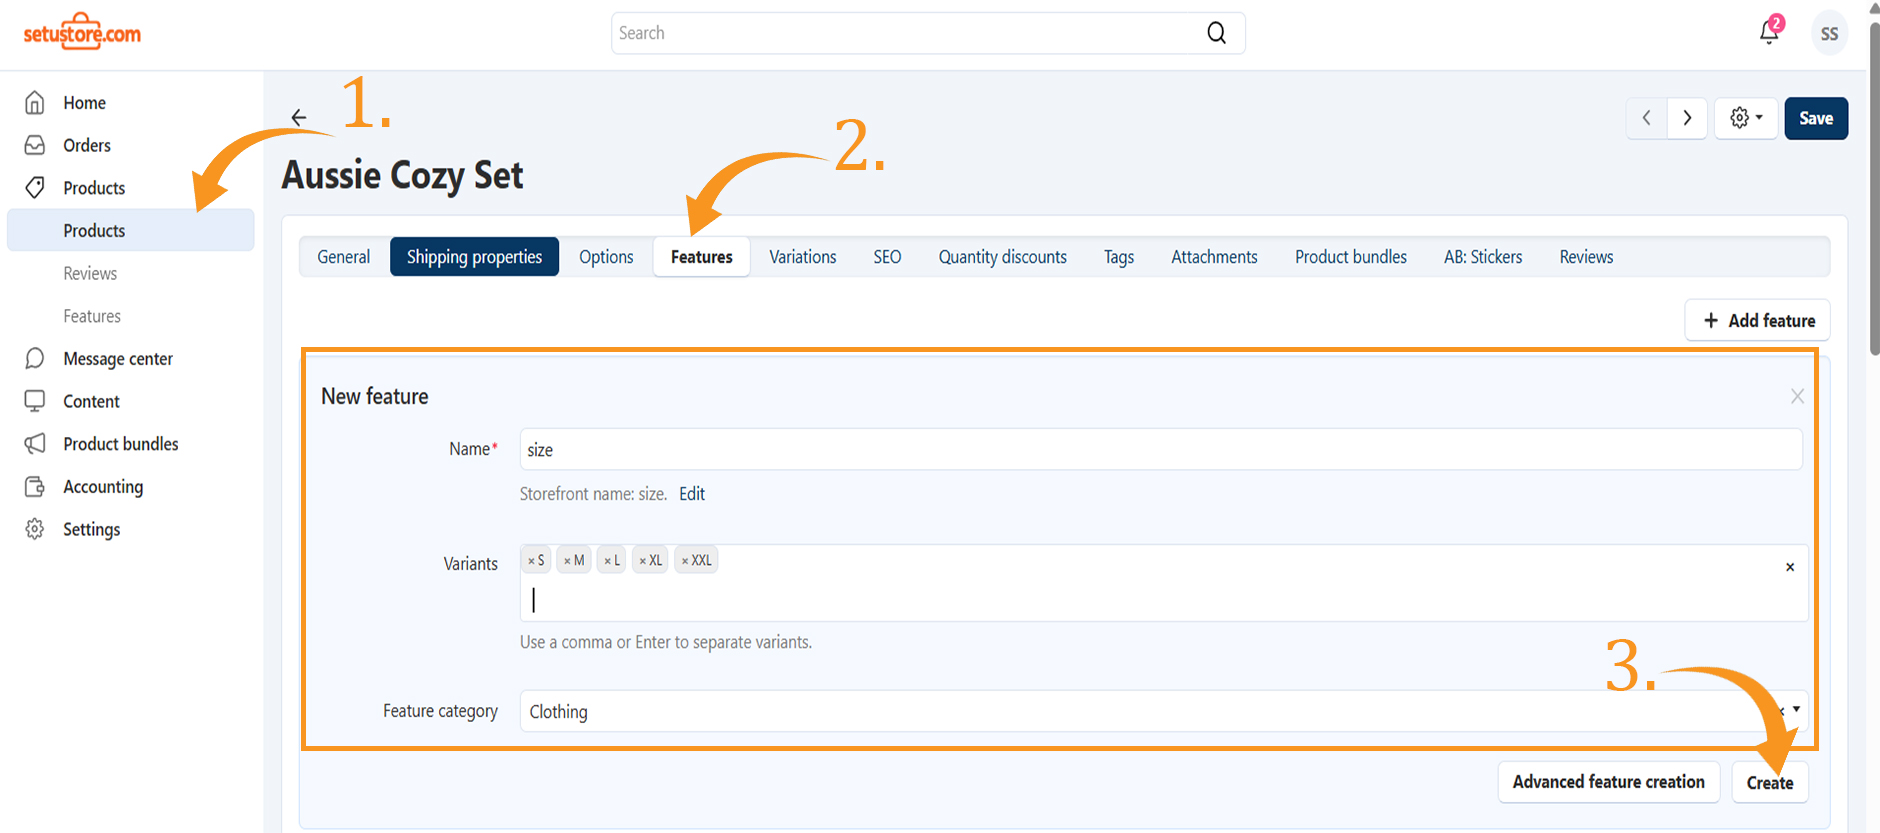
Features Tab
Features are additional, inseparable properties of your products that allow you to include specific information relevant to what you sell. For instance, if you offer printed books, you could add an ISBN field; for music, you might include an audio format field, and so on.
In the Products → Features section, you’ll find a complete list of all features available in your store. You also have the option to organize features into groups, which allows you to edit the properties of an entire group at once, rather than updating each feature individually.
Adding a Feature from a Product Page
- Go to Products → Products.
- Click the product name to open its settings.
- Navigate to the Features tab and select Add Feature.
- Complete the fields:
- Name – Enter the name of the feature.
- Storefront Name – Specify the storefront the feature belongs to.
- Variants – Add the available variants for this feature.
- Click Create to save the feature.
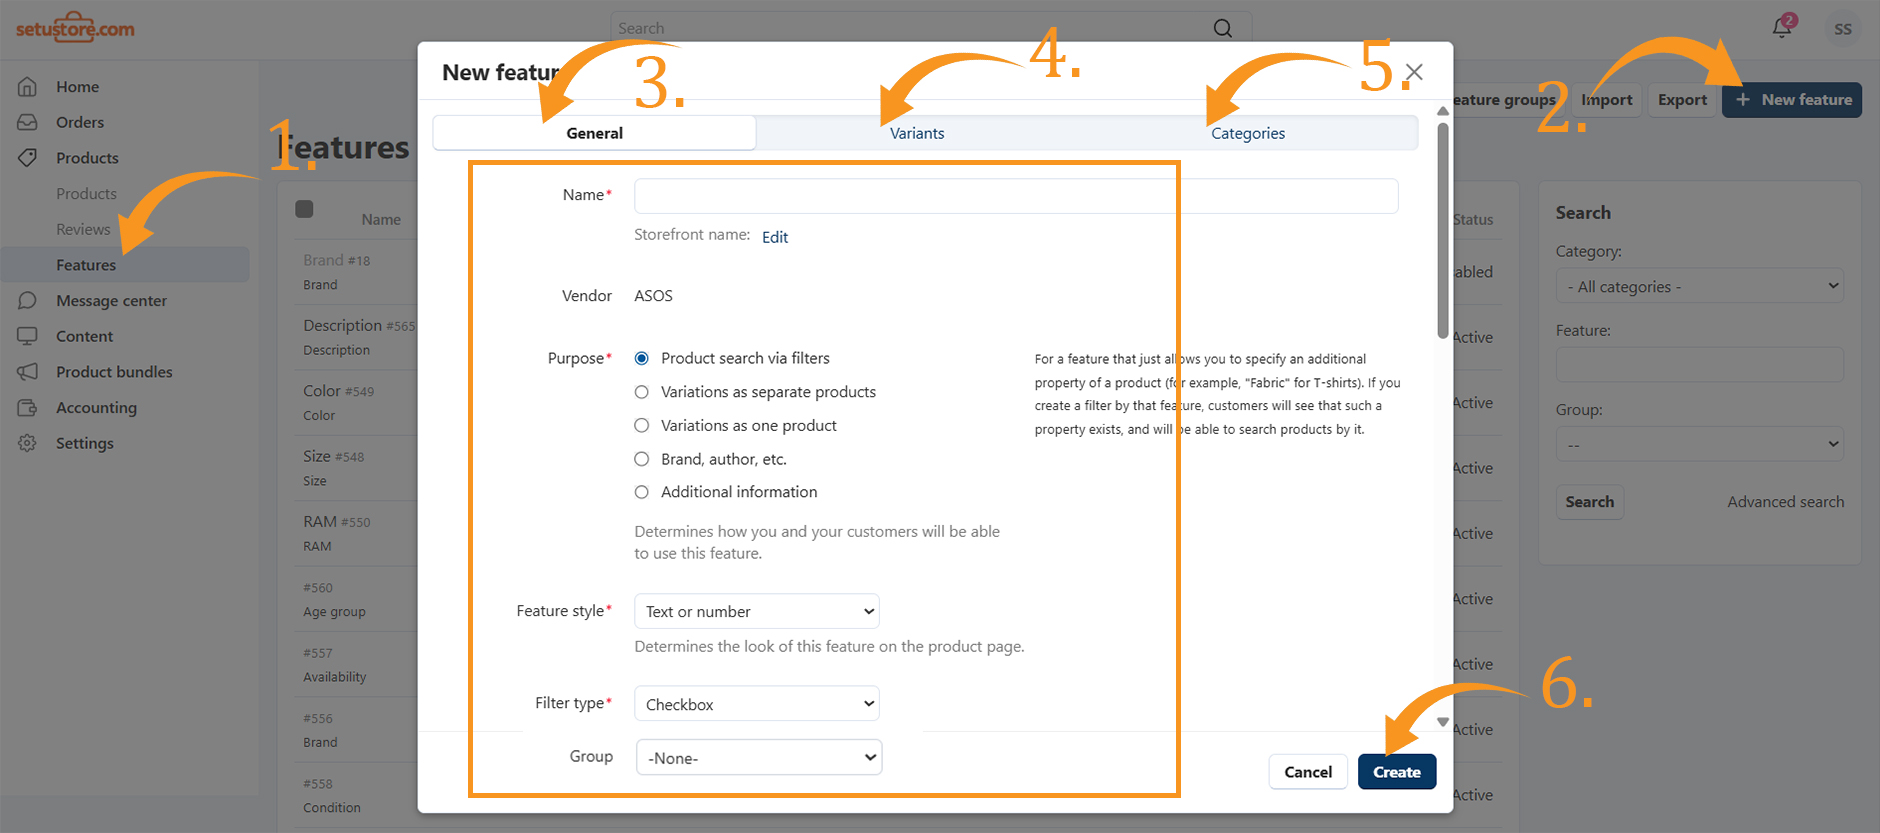
Adding a Feature from the Features List
- In the Administration panel, go to Products → Features.
- Click the + New Feature button in the top-right corner.
- Fill in the required feature properties on the General tab.
- If the feature has multiple variants, configure them on the Variants tab.
- By default, the feature will be available in all product categories. To restrict it to specific categories, use the Categories tab.
- Click Create to save the feature.
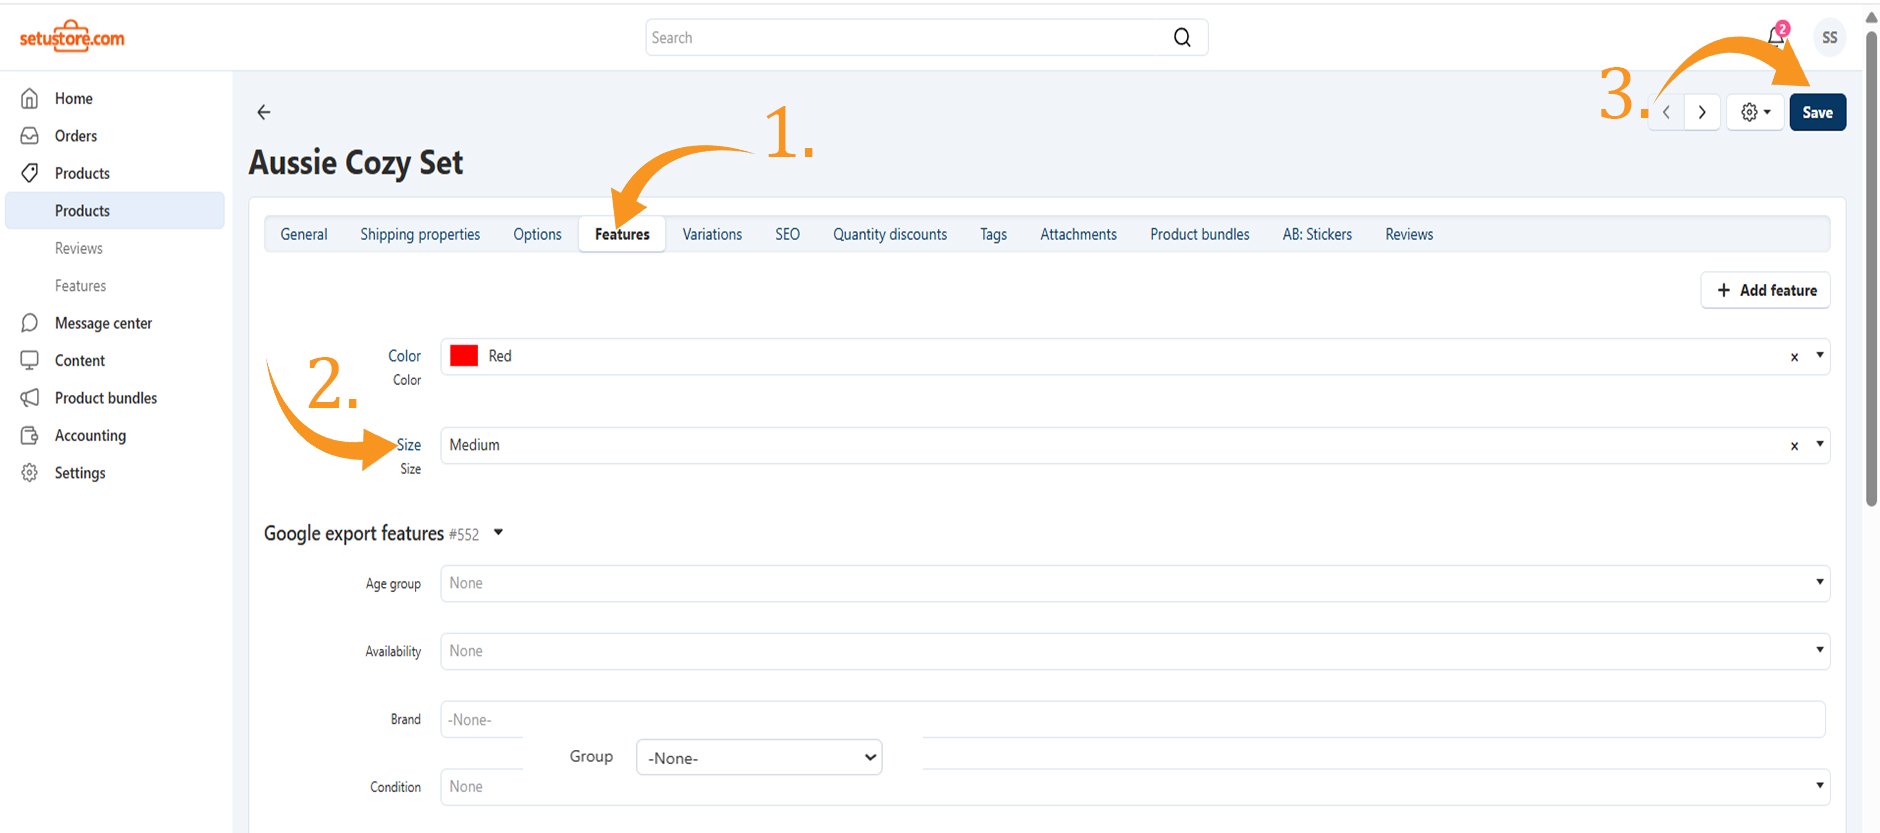
Specifying Features for a Product
- Navigate to Products → Products.
- Click the product name you want to update.
- Go to the Features tab.
- Enter the value for each feature.
- Click Save to apply changes.
Important: Enter the amount or percentage in the Value field to specify the discount to be applied to the product price.
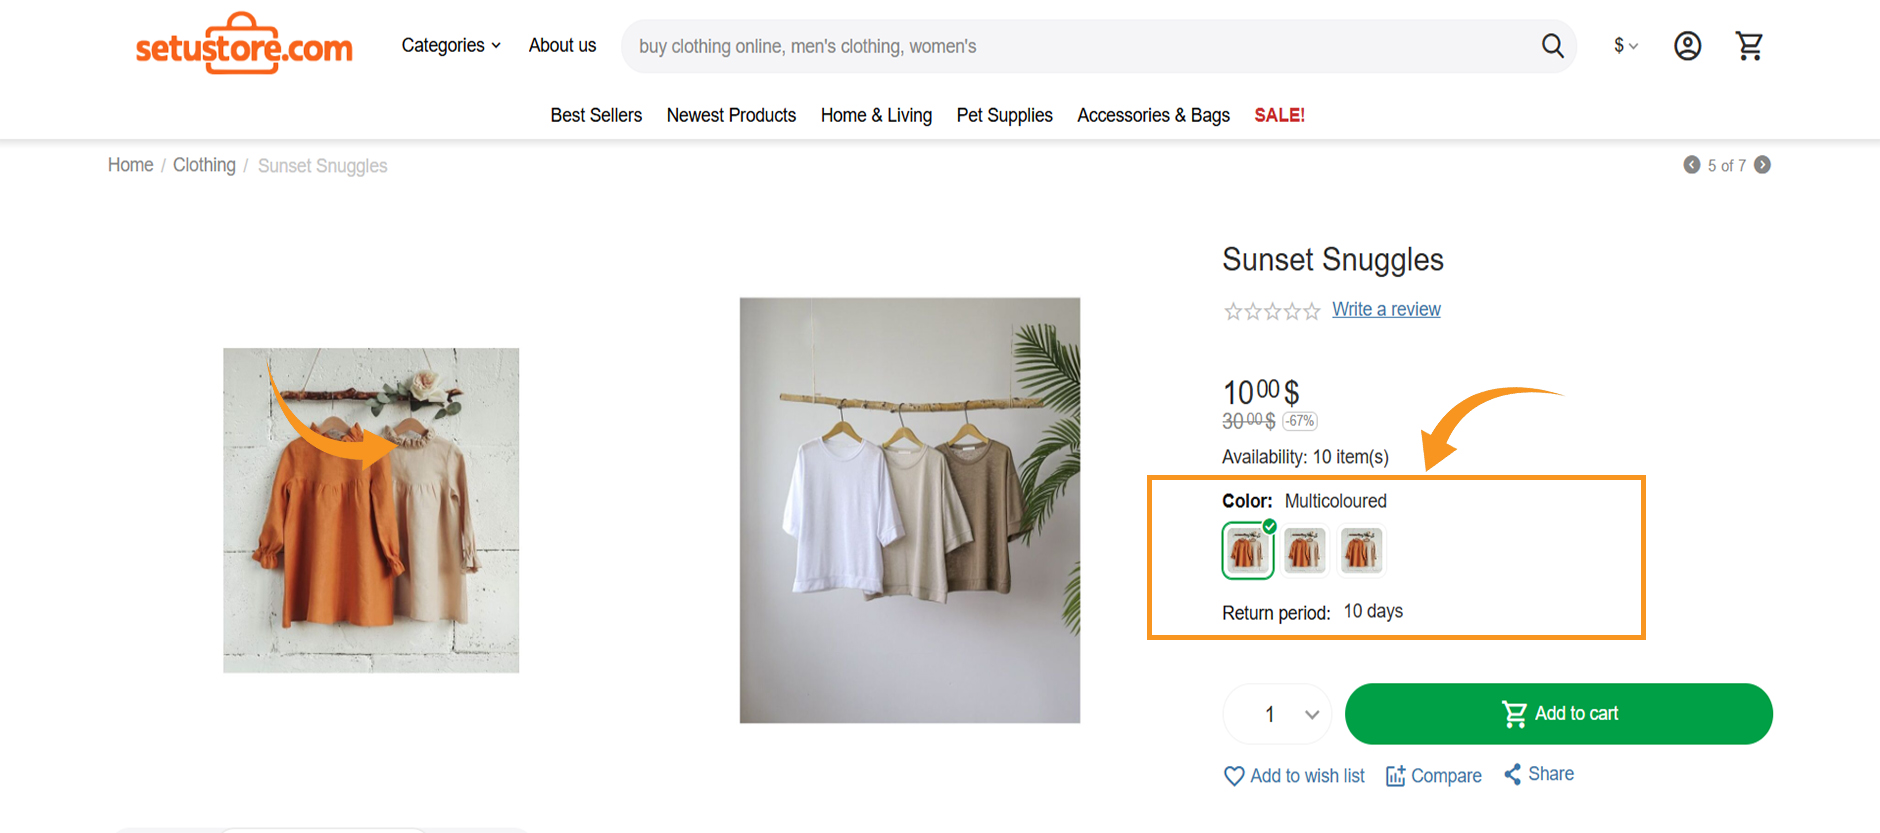
Variations Tab
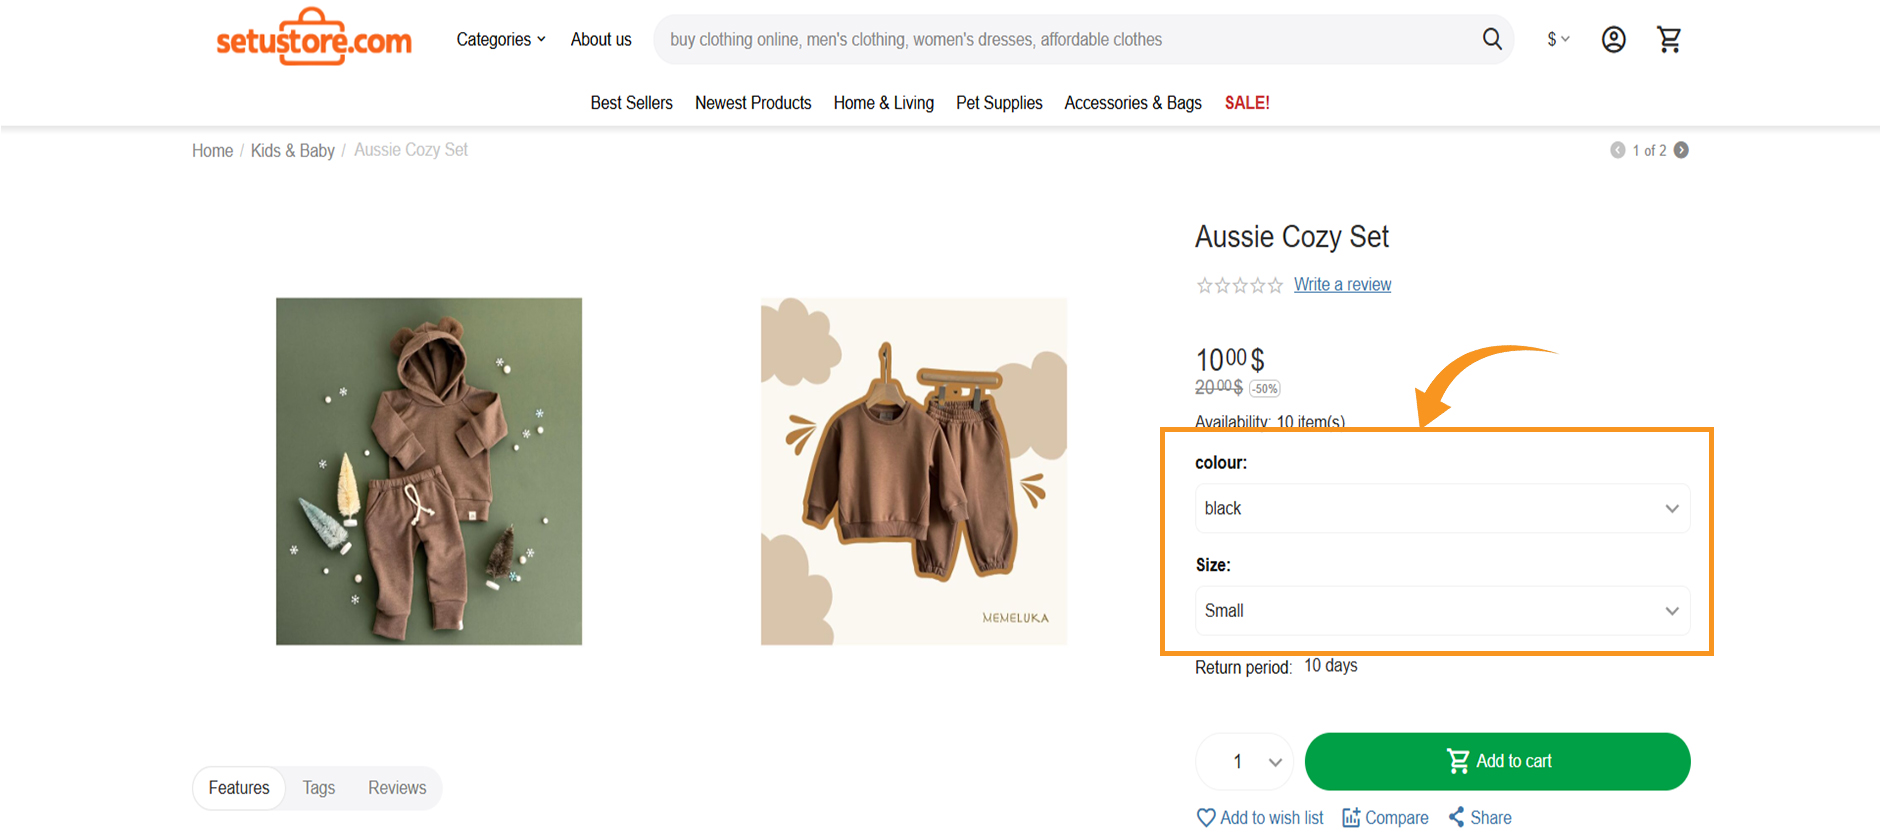
Variations allow you to create different versions of a product with distinct prices, weights, and other properties. For example, if you sell T-shirts, you can set up variations for different sizes and colors, with each variation having its own price, weight, and stock level.
Managing Product Variations
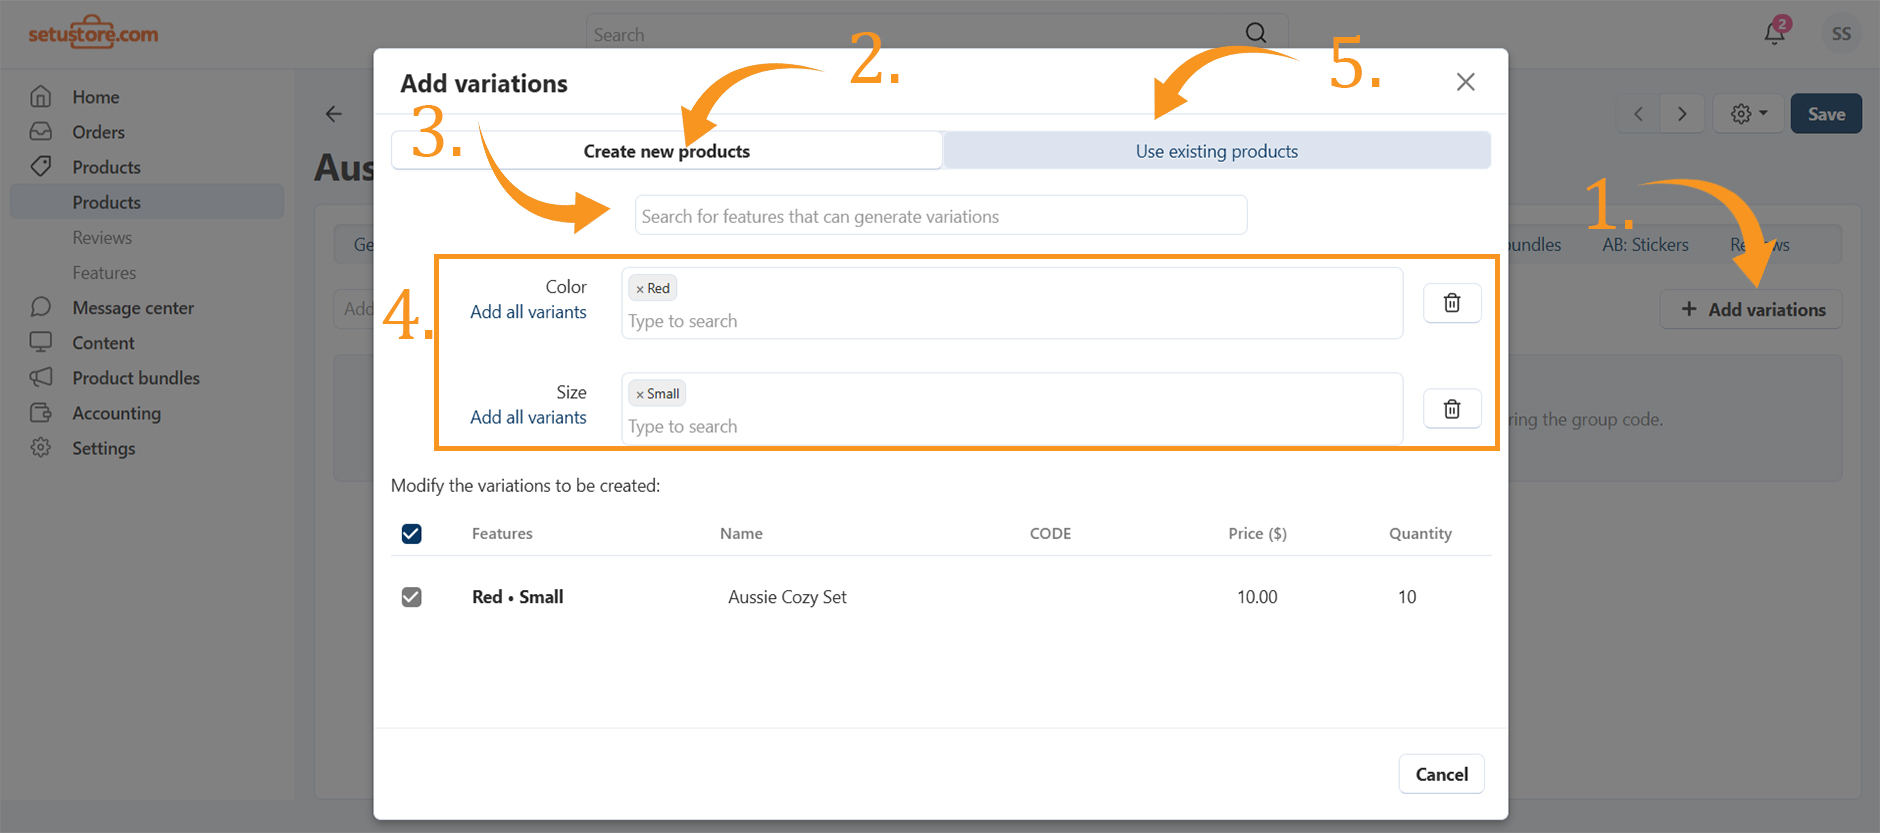
- Open the Variations tab to create and manage your product variations. You can add new variations, edit existing ones, or delete those no longer needed.
- Click Add New Variation.
- In the Create New Products tab, enter the feature name. If the feature already exists in your store, you can select it.
- If the feature doesn’t exist, click Add and choose one of the two purposes. The selected purpose determines whether variations with different feature values appear as separate items in the list.
- Add variants for your feature.
- Click Create, the variations will be generated automatically.
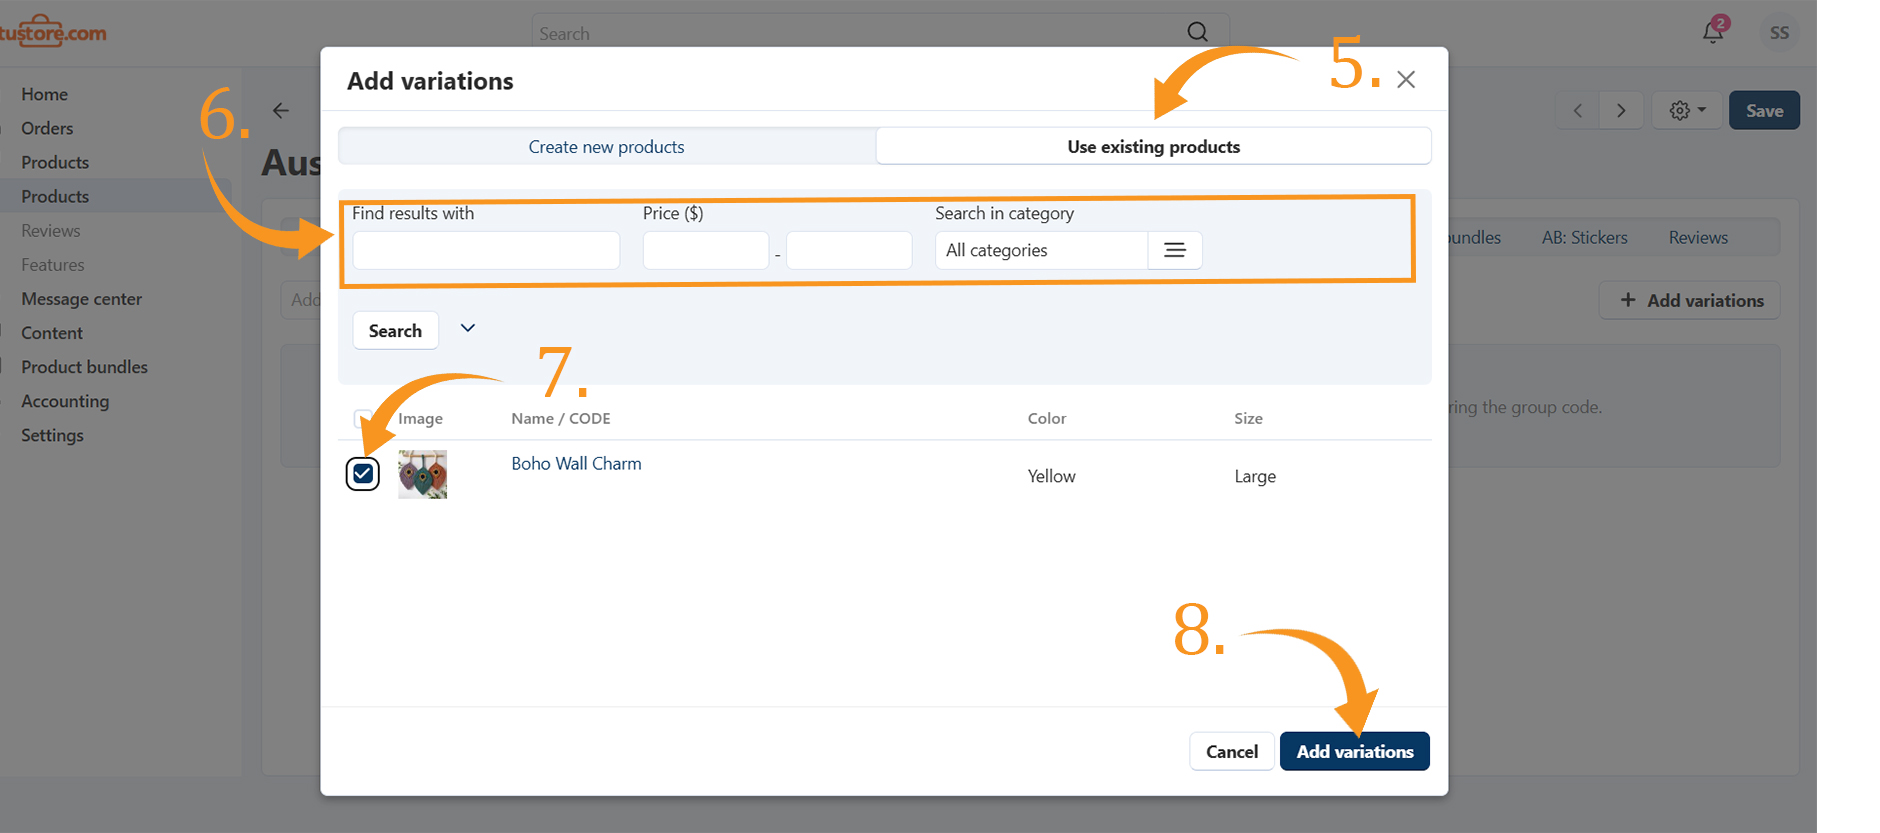
Adding Variations from Existing Products
- Open the Variations tab on the product editing page.
- Click Add variations.
- Go to the Use existing products tab to see all identical products.
- Select the products you want to include and click Add Variations.
The list will show products that meet all of the following conditions:
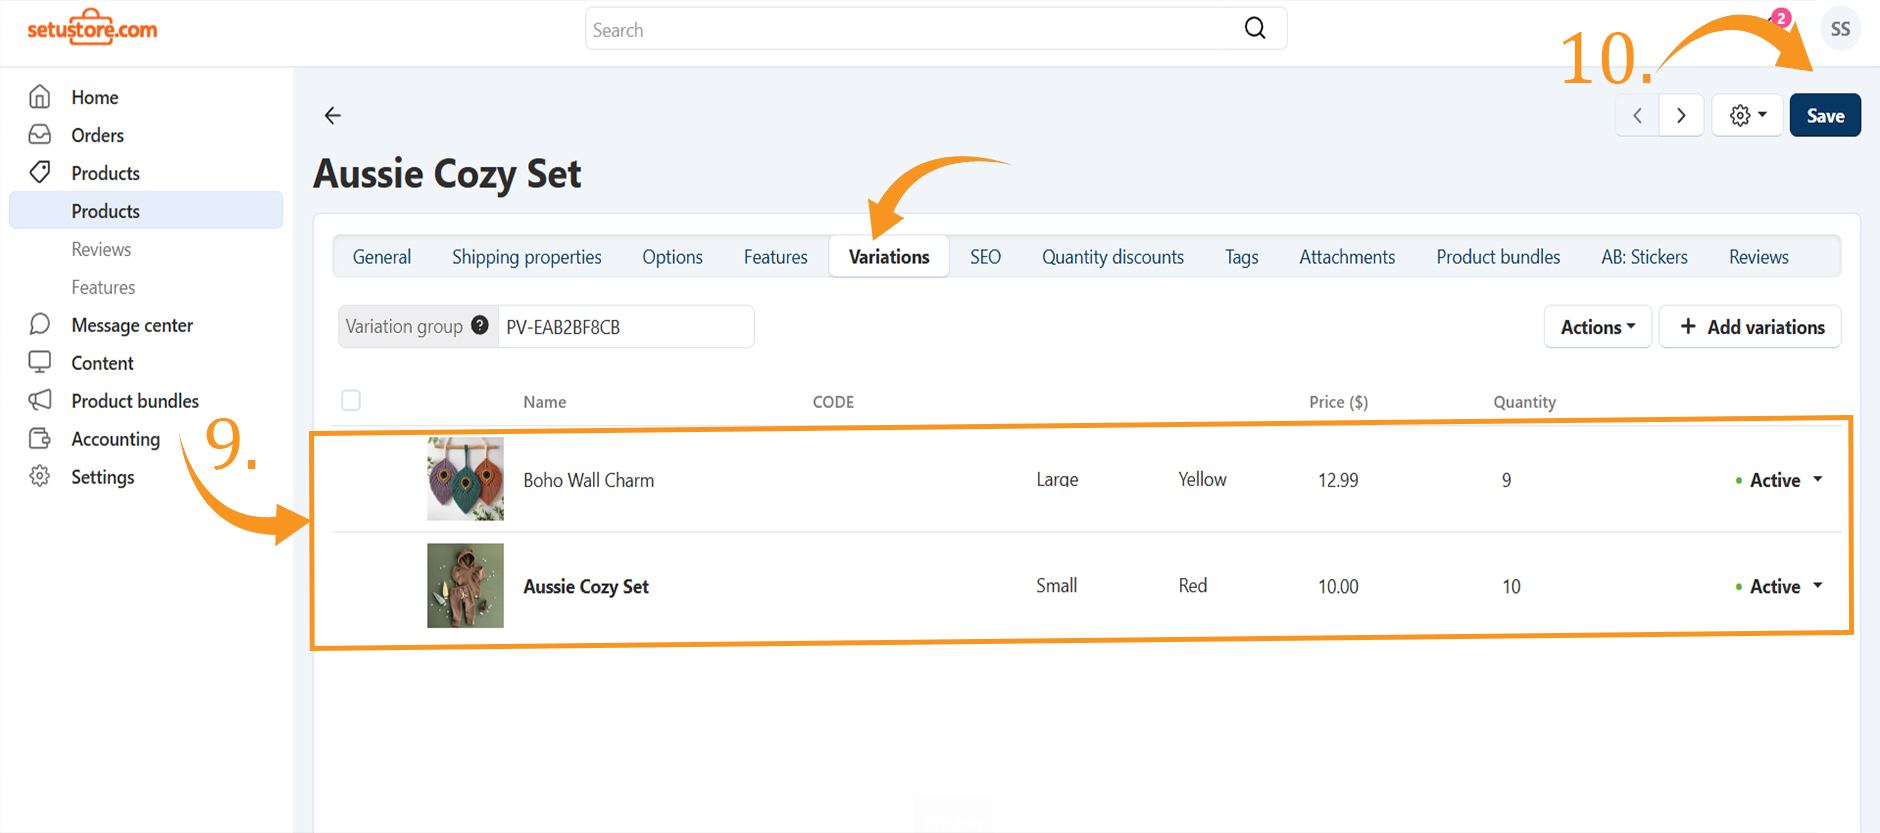
Management and Removal
- Identify which variations have their own catalog item—smaller icons indicate no catalog item.
- Select the default variation to display as the catalog item.
- Remove or delete a variation to make it independent.
- Change the group code to add new products later (only digits, Latin letters, -, and _).
- Add more variations or disband the group to make all variations independent.
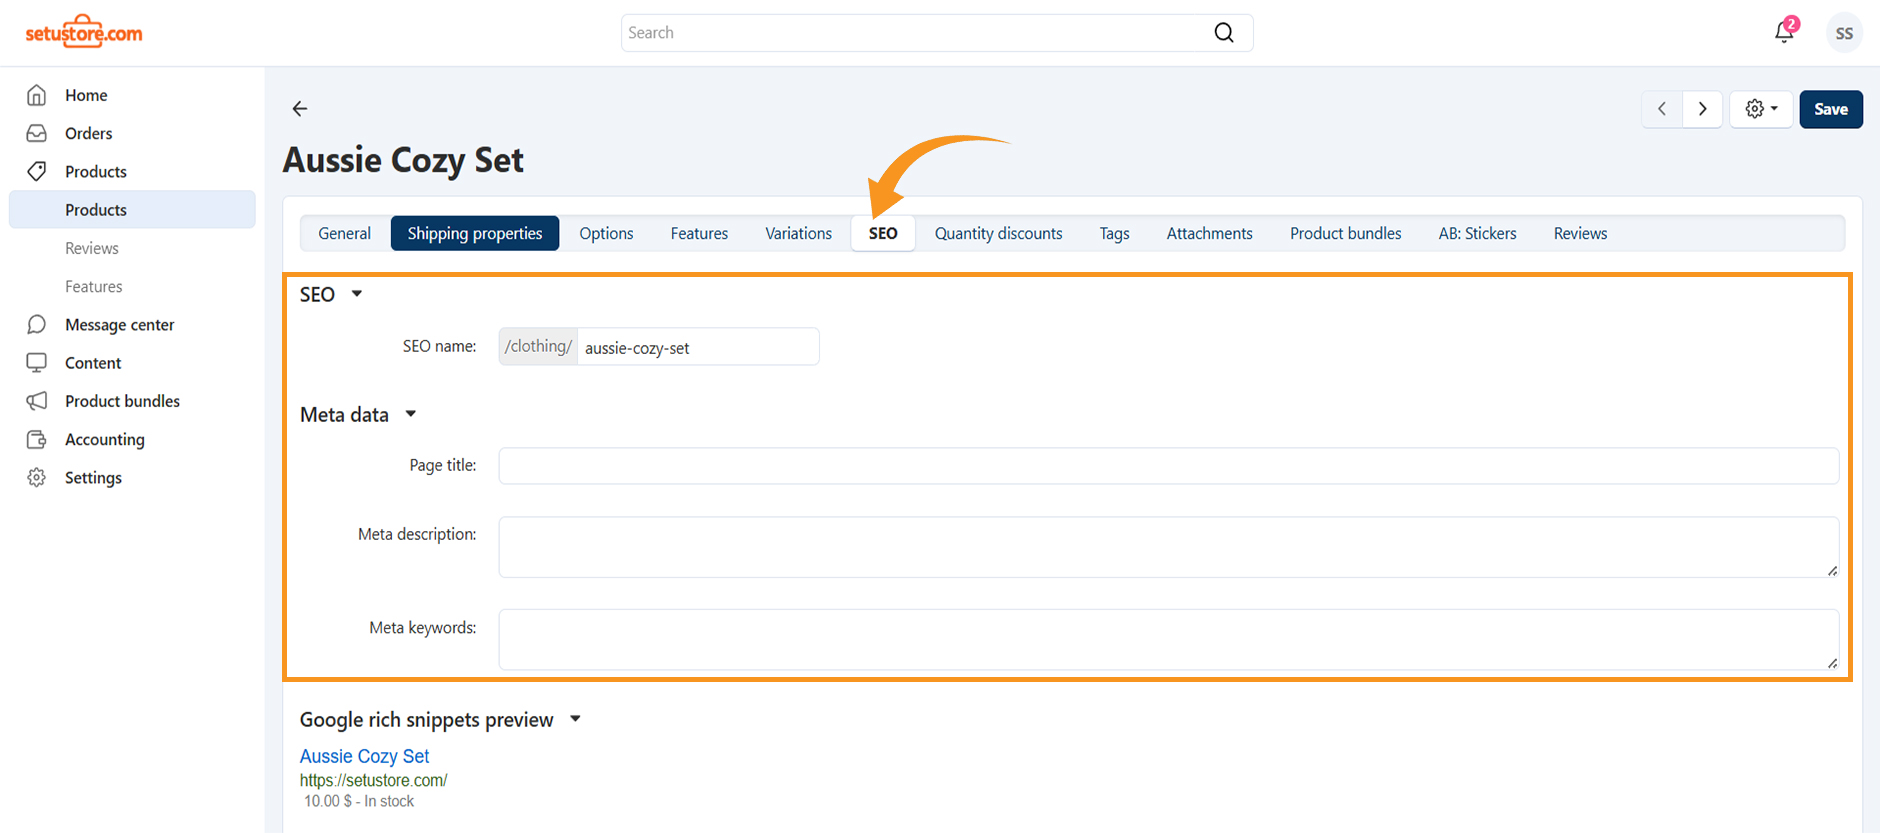
SEO
SEO helps improve your product pages’ visibility in search engines, driving more traffic and boosting sales.
In the SEO tab, you can add meta information for your product pages:
- SEO Name – Enter your product name.
- Page Title – Specify the title of the page.
- Meta Description – Highlight the product’s features and why customers should buy it.
- Meta Keywords – Add relevant keywords to make your product easier to find in searches.
Quantity Discounts, Tags, Attachments
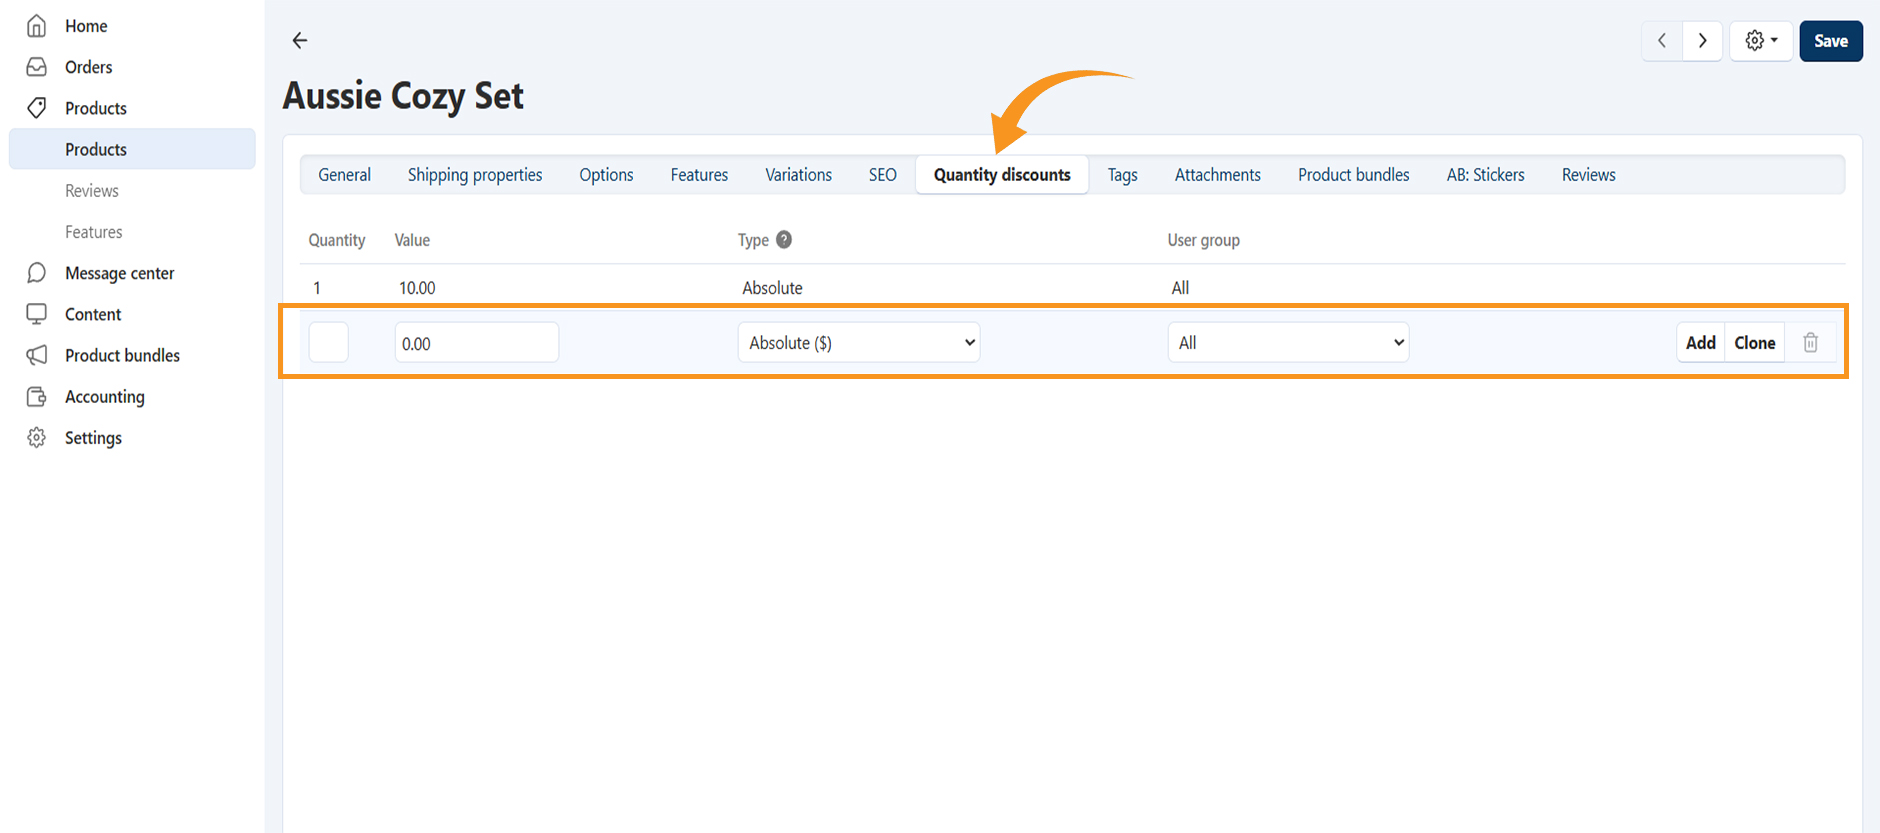
Quantity Discounts
Quantity discounts allow you to offer lower prices for customers who buy in bulk. This can help increase sales and encourage customers to buy more products.
- In the quantity field, type the amount of items for buying at discounted price.
- In value field, Enter the new price per unit.
- In Type, select absolute for fixed rated, and percentage for % discount on the price.
- In User Group, Select the user group, such as customers.
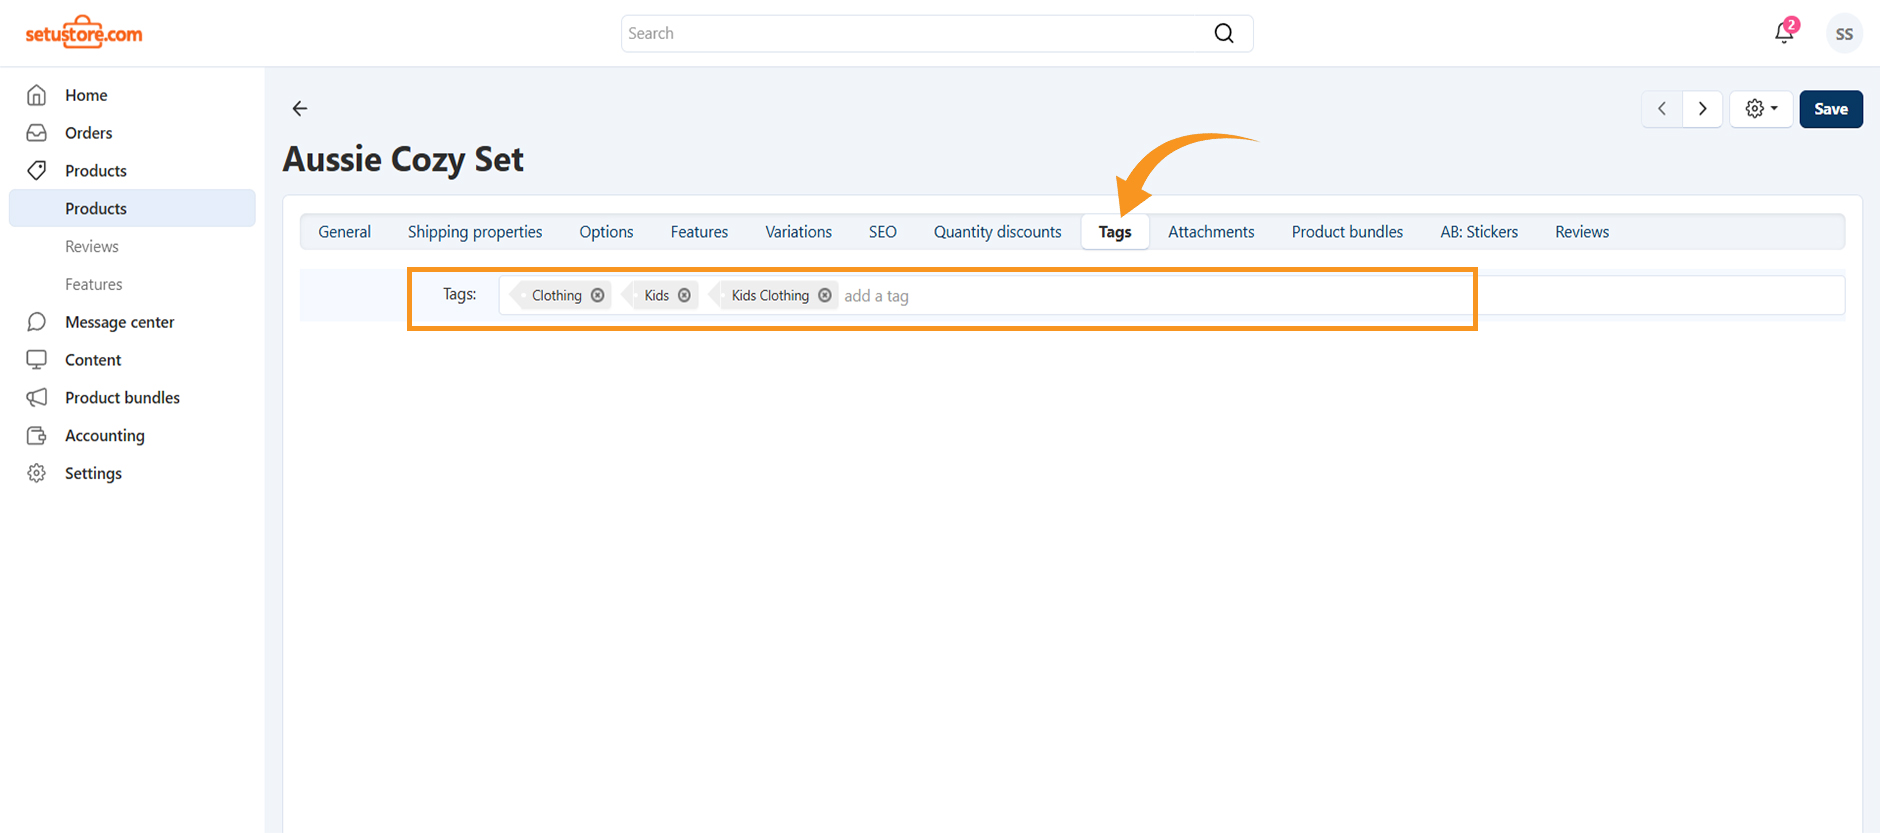
Tags
Tags are keywords that help categorize your products and make them easier to find in search results. Adding relevant tags improves visibility and helps customers find what they’re looking for.
- Tags Field – Enter tags related to your product, separated by commas.
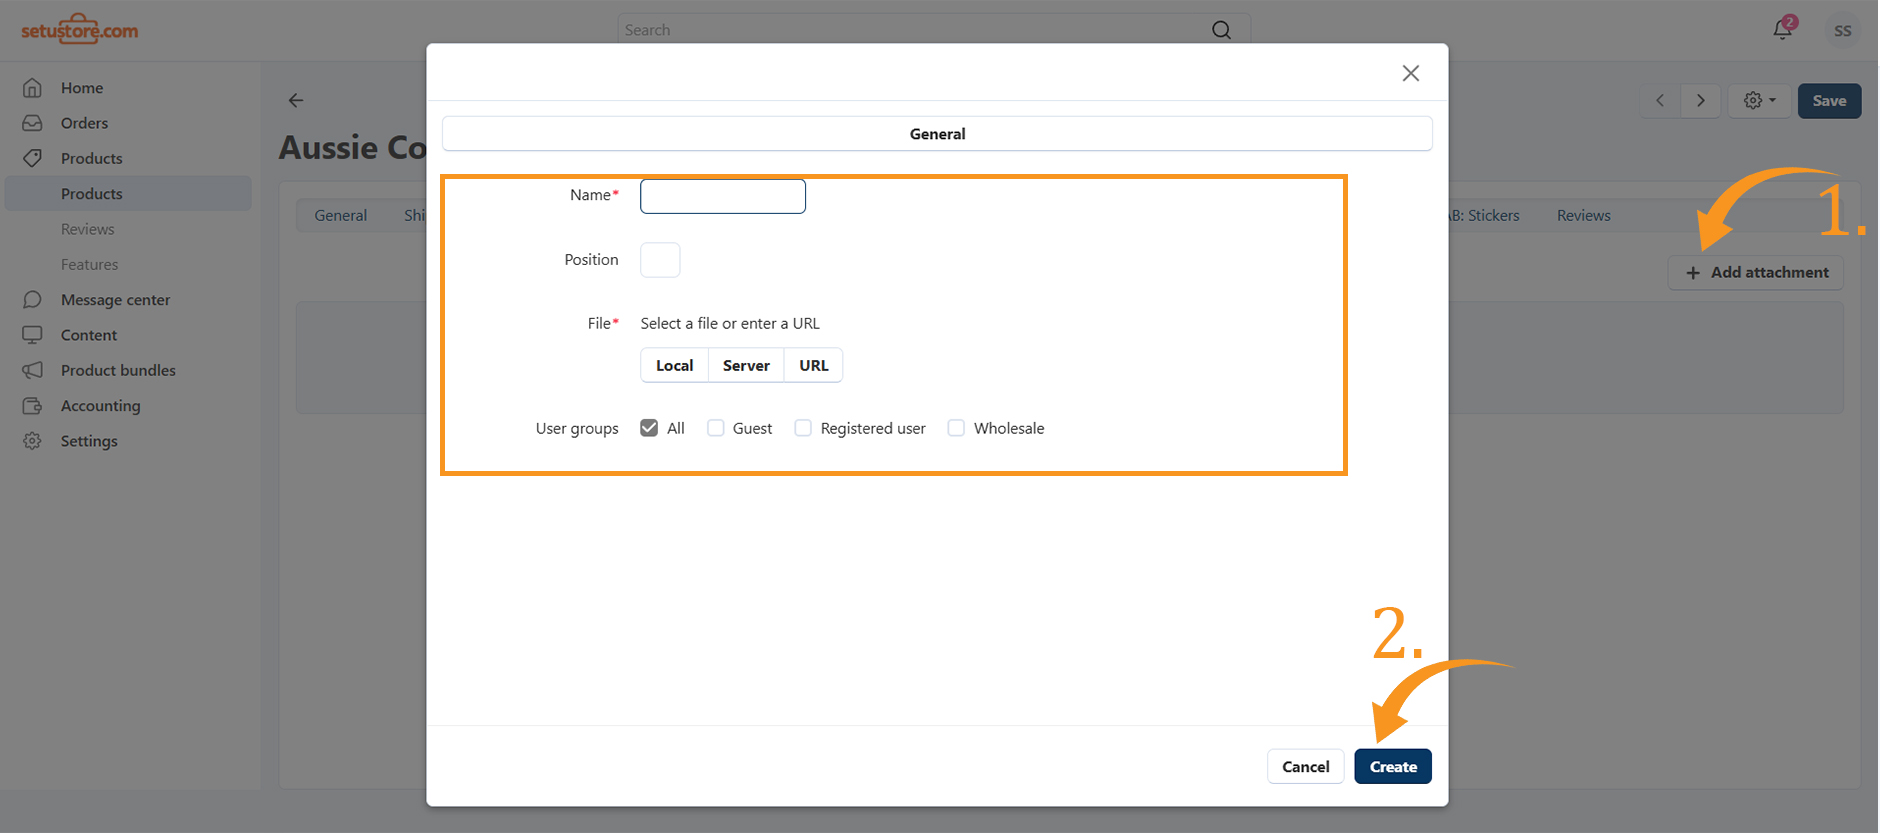
Attachments
You can add attachments, such as user guides, in the Attachments tab.
- Go to Attachments and click + Add Attachments.
- Enter a name, upload the file, and select the user group.
- Click Create to save the attachment.
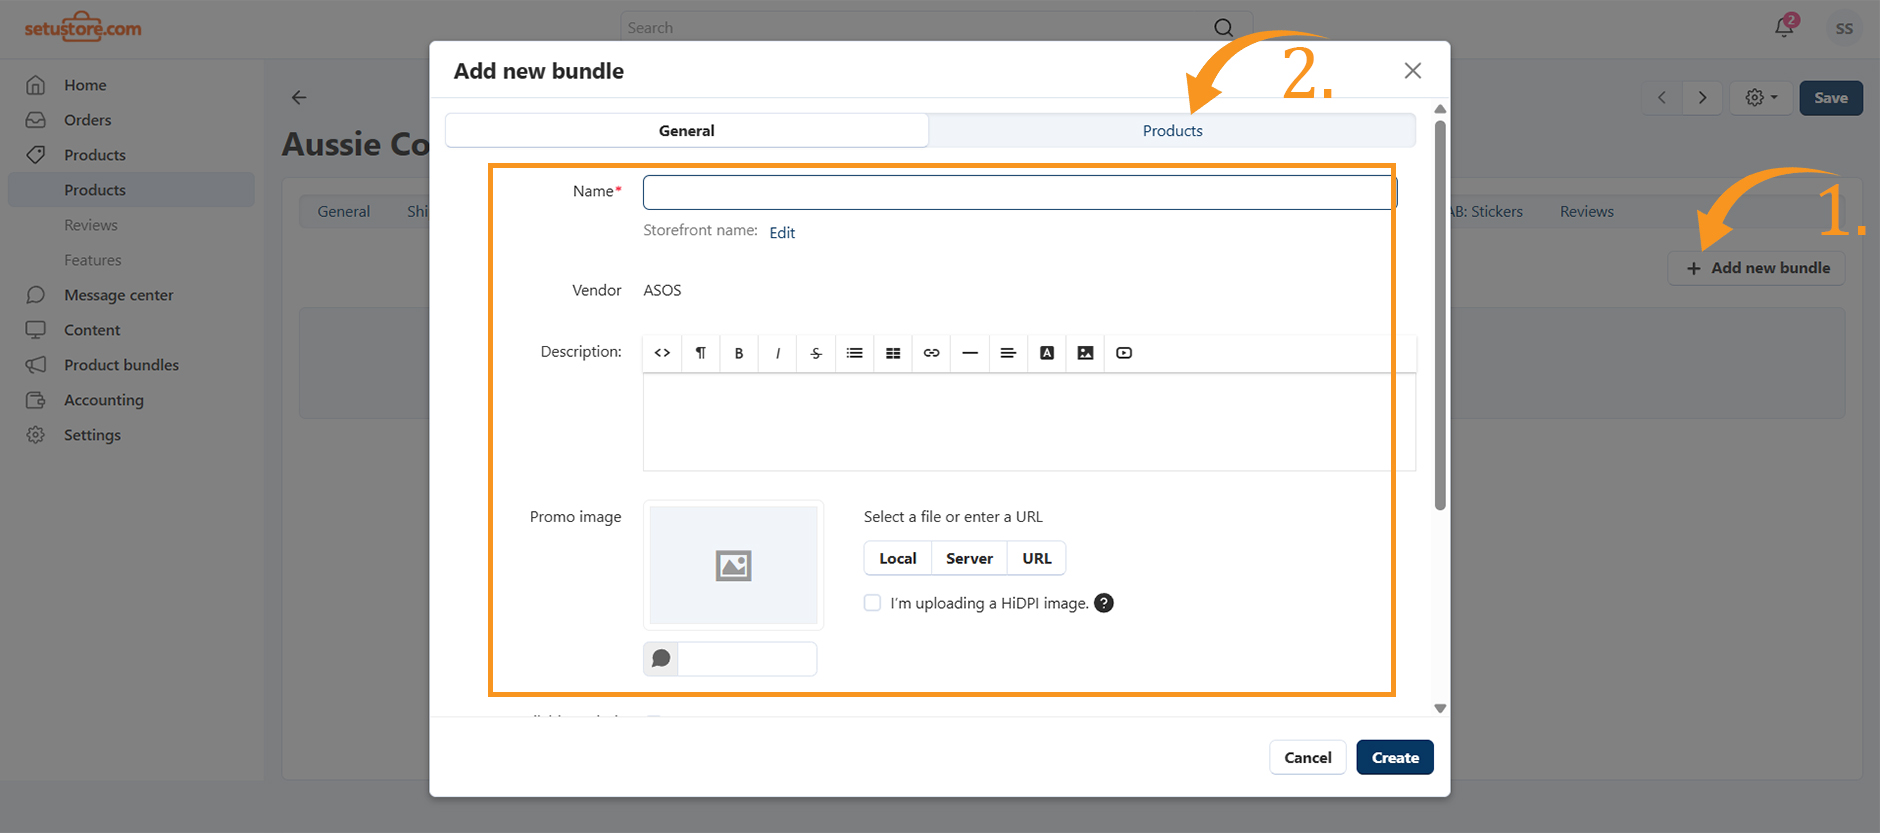
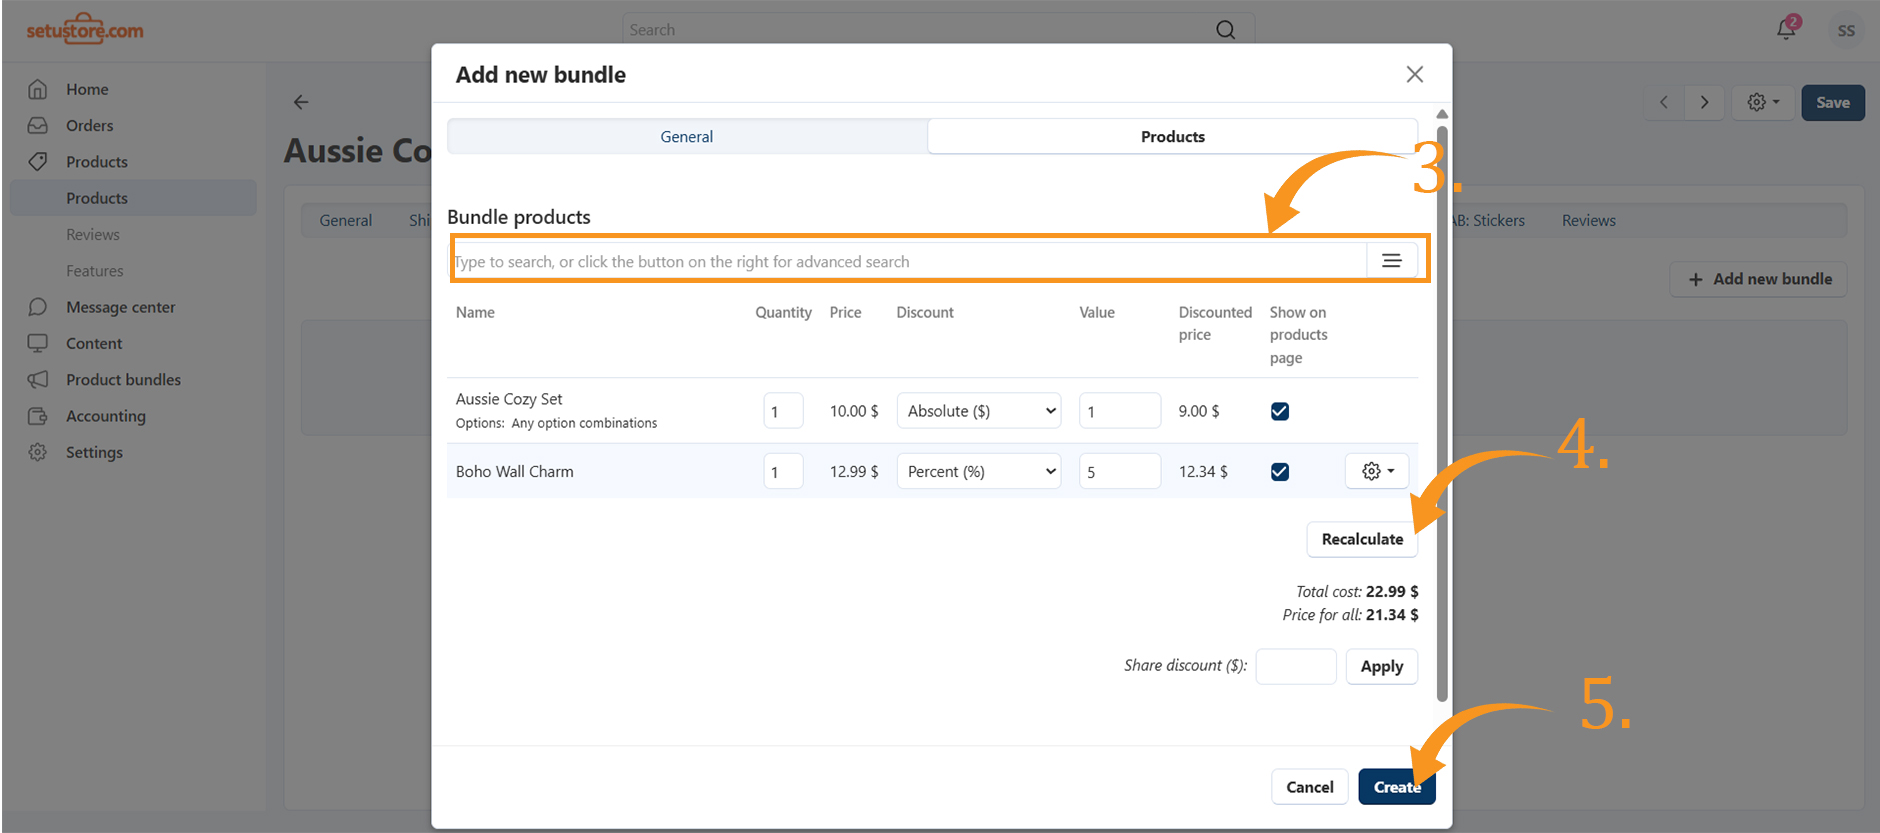
Product Bundles
Product bundles let you group multiple products and sell them as a single unit, increasing sales and offering customers better value.
To create a bundle:
- Click . Add New Bundles
- Enter the Bundle Name and write a Description.
- Set availability for a specific time period, if desired.
- Go to Products in the same window, use the search bar to find products, and select the ones to include in the bundle.
- Optionally, add Discounts for the bundled products.
- Click Create to save the bundle.
Note: After Filling all the required details, make sure to save them by clicking on the "Save" button at the top right corner of the page.
Vendor Support
Have questions about the registration process? Our team is here to help.
- Email: harsh@setustore.com
- Phone: +91 7838797366 (Mon-Sun, 9AM-6PM)
- Message Center: Available on the Setu Store website Vendor Panel